Get started with greytHR PRO
Updated in April - 2025 | Subscribe to watch greytHR how-to video
greytHR PRO enhances greytHR for our PSP clients. It securely manages access to client accounts without needing to maintain multiple URLs and login details. This also eliminates the need for PSPs to change all client passwords when an associate leaves.
To get started with greytHR PRO, follow these steps:
Assign team members access to greytHR PRO account.
Assign clients to team members.
Move the clients.
Log in to customers'/clients' greytHR accounts.
Assign new team members to clients.
Let us now briefly understand each of these steps.
Assign team members access to greytHR PRO account
The greytHR’s Implementation team assigns the PSPs access to the greytHR PRO account. Later, the PSPs can invite other admins to access the account.
To assign access to the greytHR PRO account, perform the following actions:
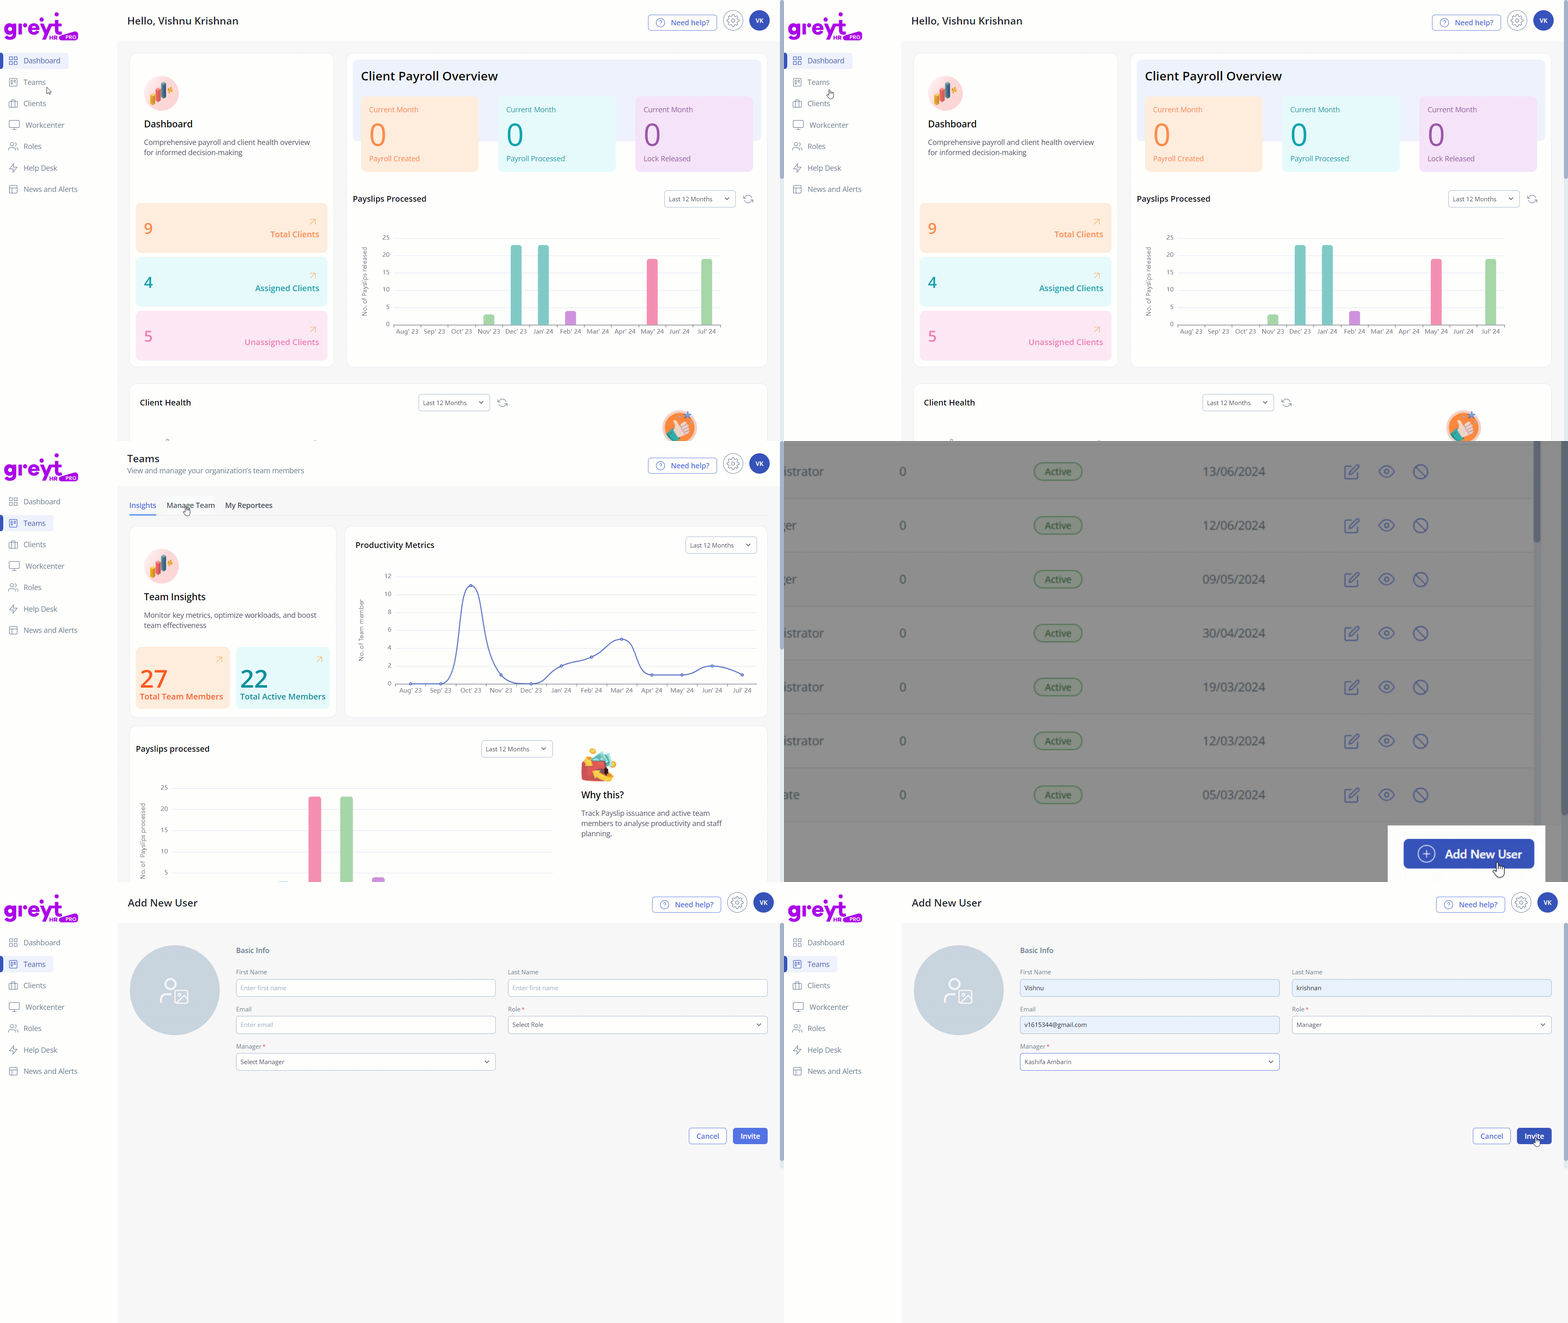
From the greytHR PRO account, navigate to Teams. The Teams page opens and displays summary cards on the top with the user distribution—Total Active Users, Active Administrators, Active Managers, and Active Associates.

Select the Manage Team tab.
Click + Add New User. The + Add New User page opens.
Under the Basic Info section, in the First Name text box, enter the first name of the required PSP customer.
In the Last Name text box, enter the last name of the required PSP customer.
In the Email text box, enter the email address.
From the Role dropdown list, select the required role.
From the Manager dropdown list, select the required manager’s name.
Click Invite to assign the PSPs access to the greytHR PRO account.
Note:A welcome email is sent to the PSP to further access the greytHR PRO account.
You can view the invite status in the Status column as Pending/Active/Link Expired.
The Invite link in the welcome mail is active only for 72 hours.
You can view/edit/disable the user information by clicking the Edit user information/View user details/Disable user icons.
The Insights tab displays team insights through individual cards such as Productivity Metrics, Payslips processed, Quality of Service, and Aging of tickets.
Assign clients to team members
The primary objective of greytHR PRO is to simplify client management for PSP clients. It eliminates the need for PSPs to maintain lists of client URLs, usernames, and passwords. During the initial setup of greytHR PRO for a PSP, all client information is fetched and configured so PSP users can access client accounts with a single click.
To assign clients to team members, perform the following actions:

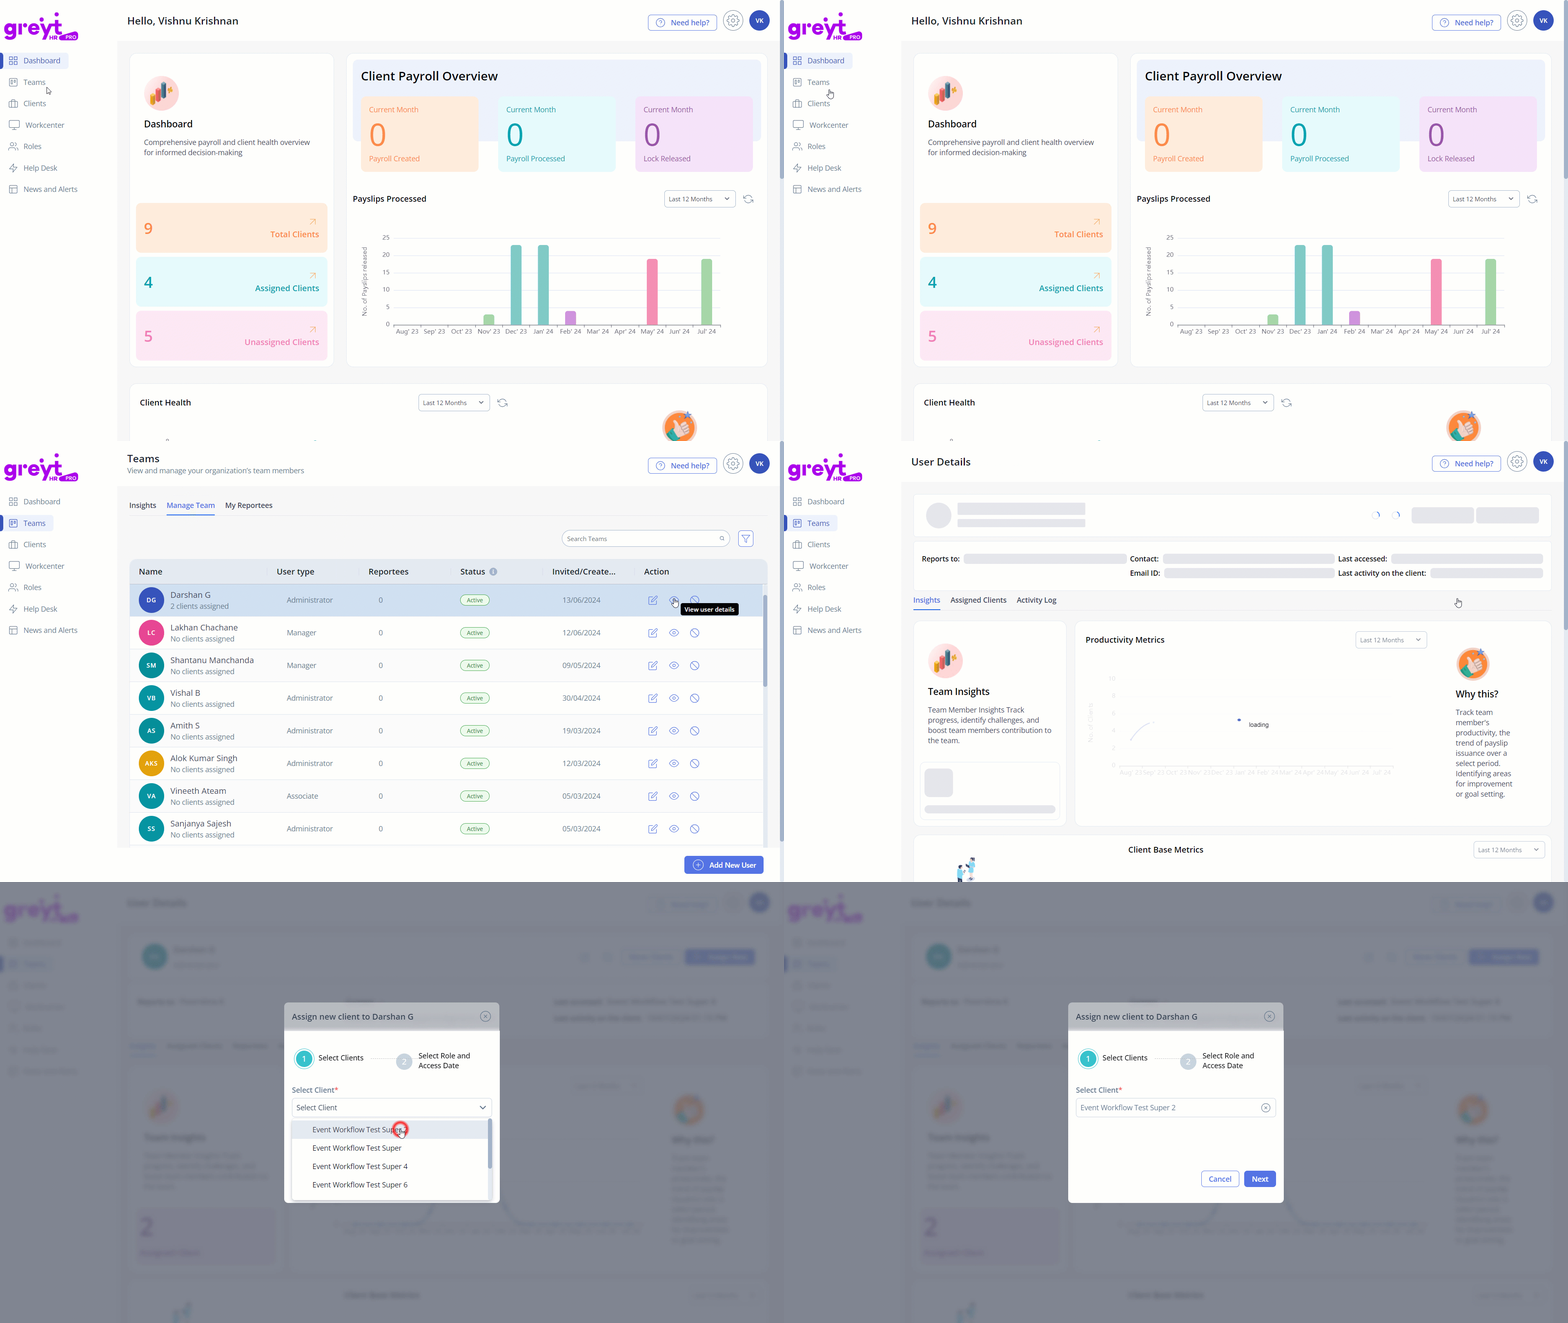
On the Teams page, click the Manage Team tab. A list of team members appears.
Select the required team member and click the View user details icon available on the selected team member’s row.
Click Assign New. The Assign New Client to pop-up appears.
From the Select Client dropdown list, select the required client.
Click Next.
From the Select greytHR role dropdown list, select the required role.
Enable/Disable the Assign to client permanently should button if you want to permanently assign the team member to the selected client.
From the dropdown calendar select the required time range.
Click Assign. The Assign Confirmation pop-up appears.
Click Yes, Proceed to assign the client for that particular user/team member. A success message appears.
Move the clients
You can move clients from a different user/team as per your requirements. To move the clients, perform the following actions:

On the Teams page, click the Manage Team tab. A list of team members appears.
Select the required team member and click the View user details icon available on the selected team member’s row.
Click Move Clients. The Move client pop-up appears.
In the Search box, enter the name of the user whose clients you want to move. A list of clients assigned to the selected user appears.
Select the clients that you want to move using the checkbox.
Click Move. The Move Confirmation pop-up appears.
Click Yes, Proceed to move clients of user/team members to the selected user. A success message appears.
Log in to customers'/clients' greytHR accounts
As an admin, you can log in to all the customers' accounts. However, the associates can log in to only the clients' accounts that are assigned to them. The PSPs can directly access customers'/clients' greytHR accounts through Single Sign-On (SSO).
To directly log in to the customers'/clients' greytHR accounts through greytHR PRO, perform the following actions:

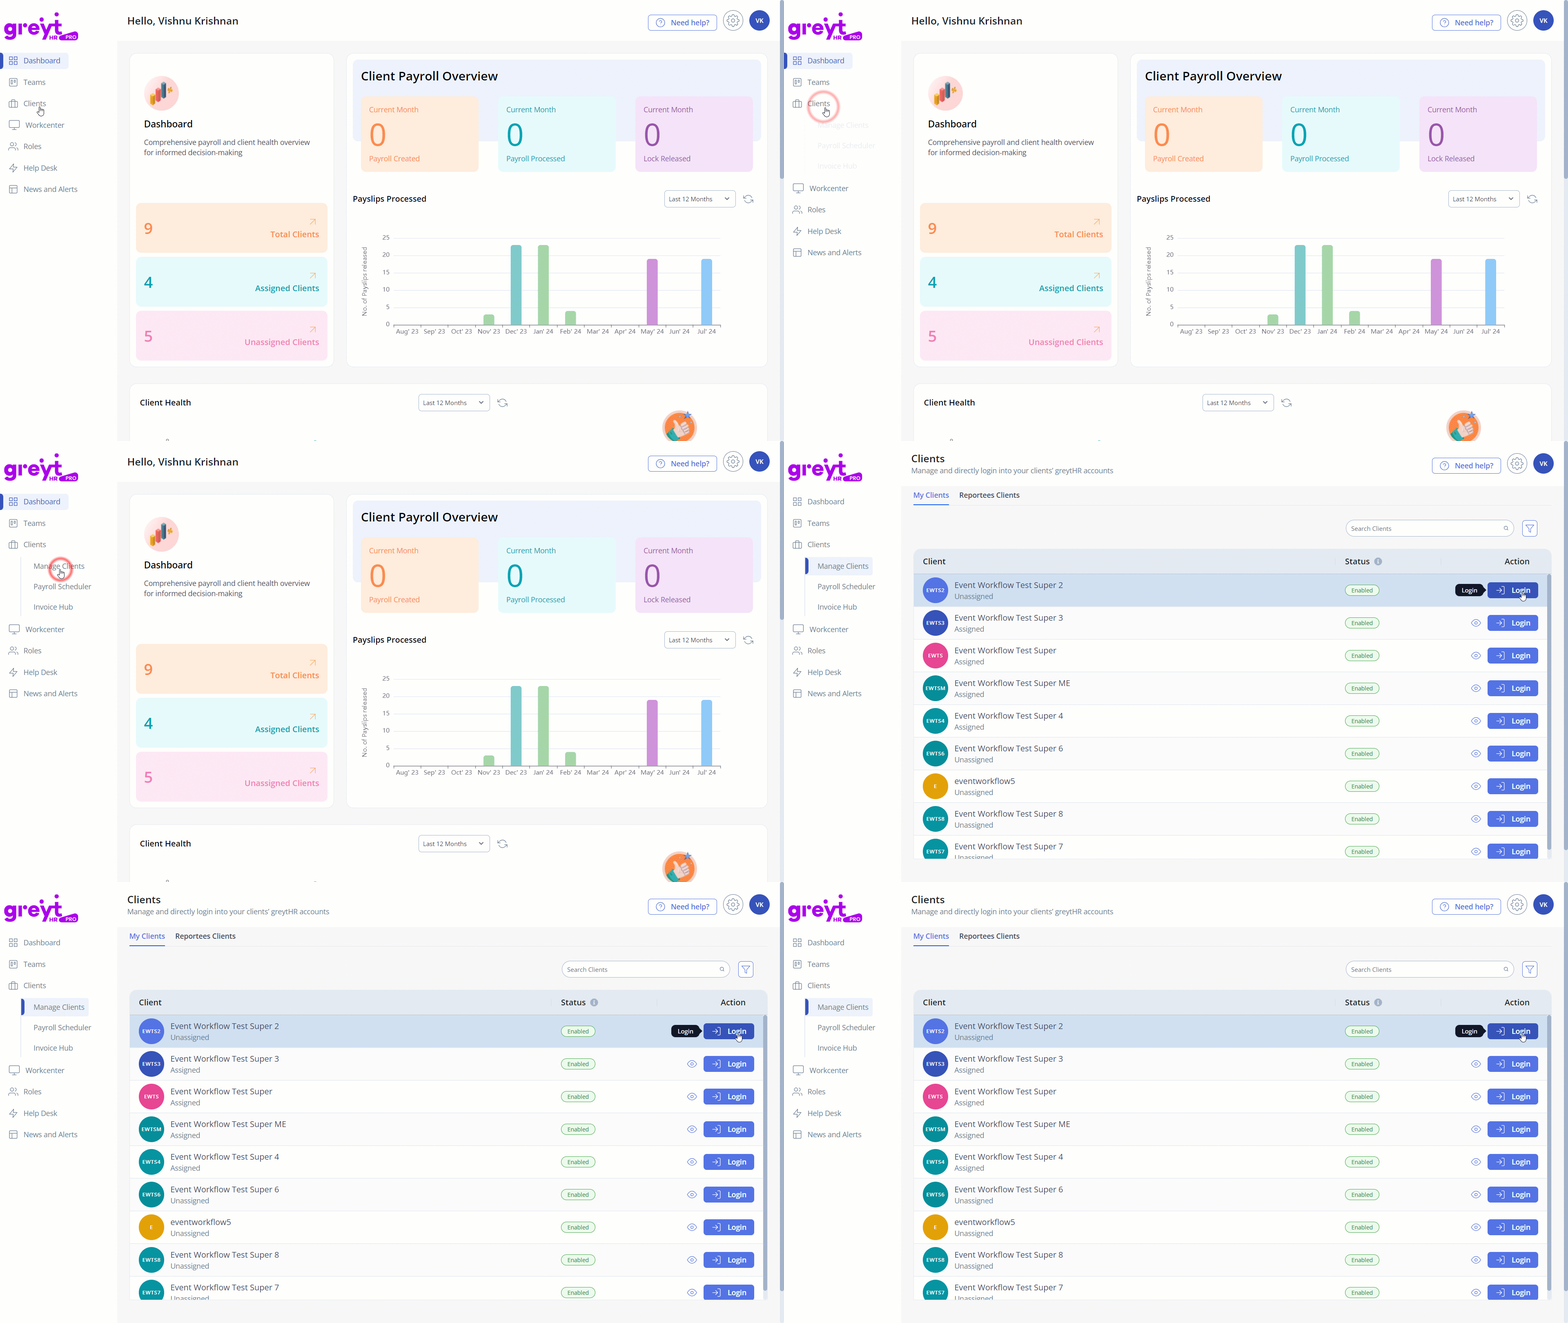
From the greytHR PRO account, navigate to Clients. The Clients page opens.
Select the client whose account you want to log in and click the →] Login button available on the selected client’s row to directly log in to the customers'/clients' greytHR account through Single Sign-On (SSO).
Note: As a PSP, you can also directly click the client account to view the client details, Dashboard, Manage Assignee, and Activity Log tabs.
Assign new team members to clients
Only the PSP admins and the team members assigned the role of an Admin can assign new team members to clients.
To assign new team members to clients, perform the following actions:

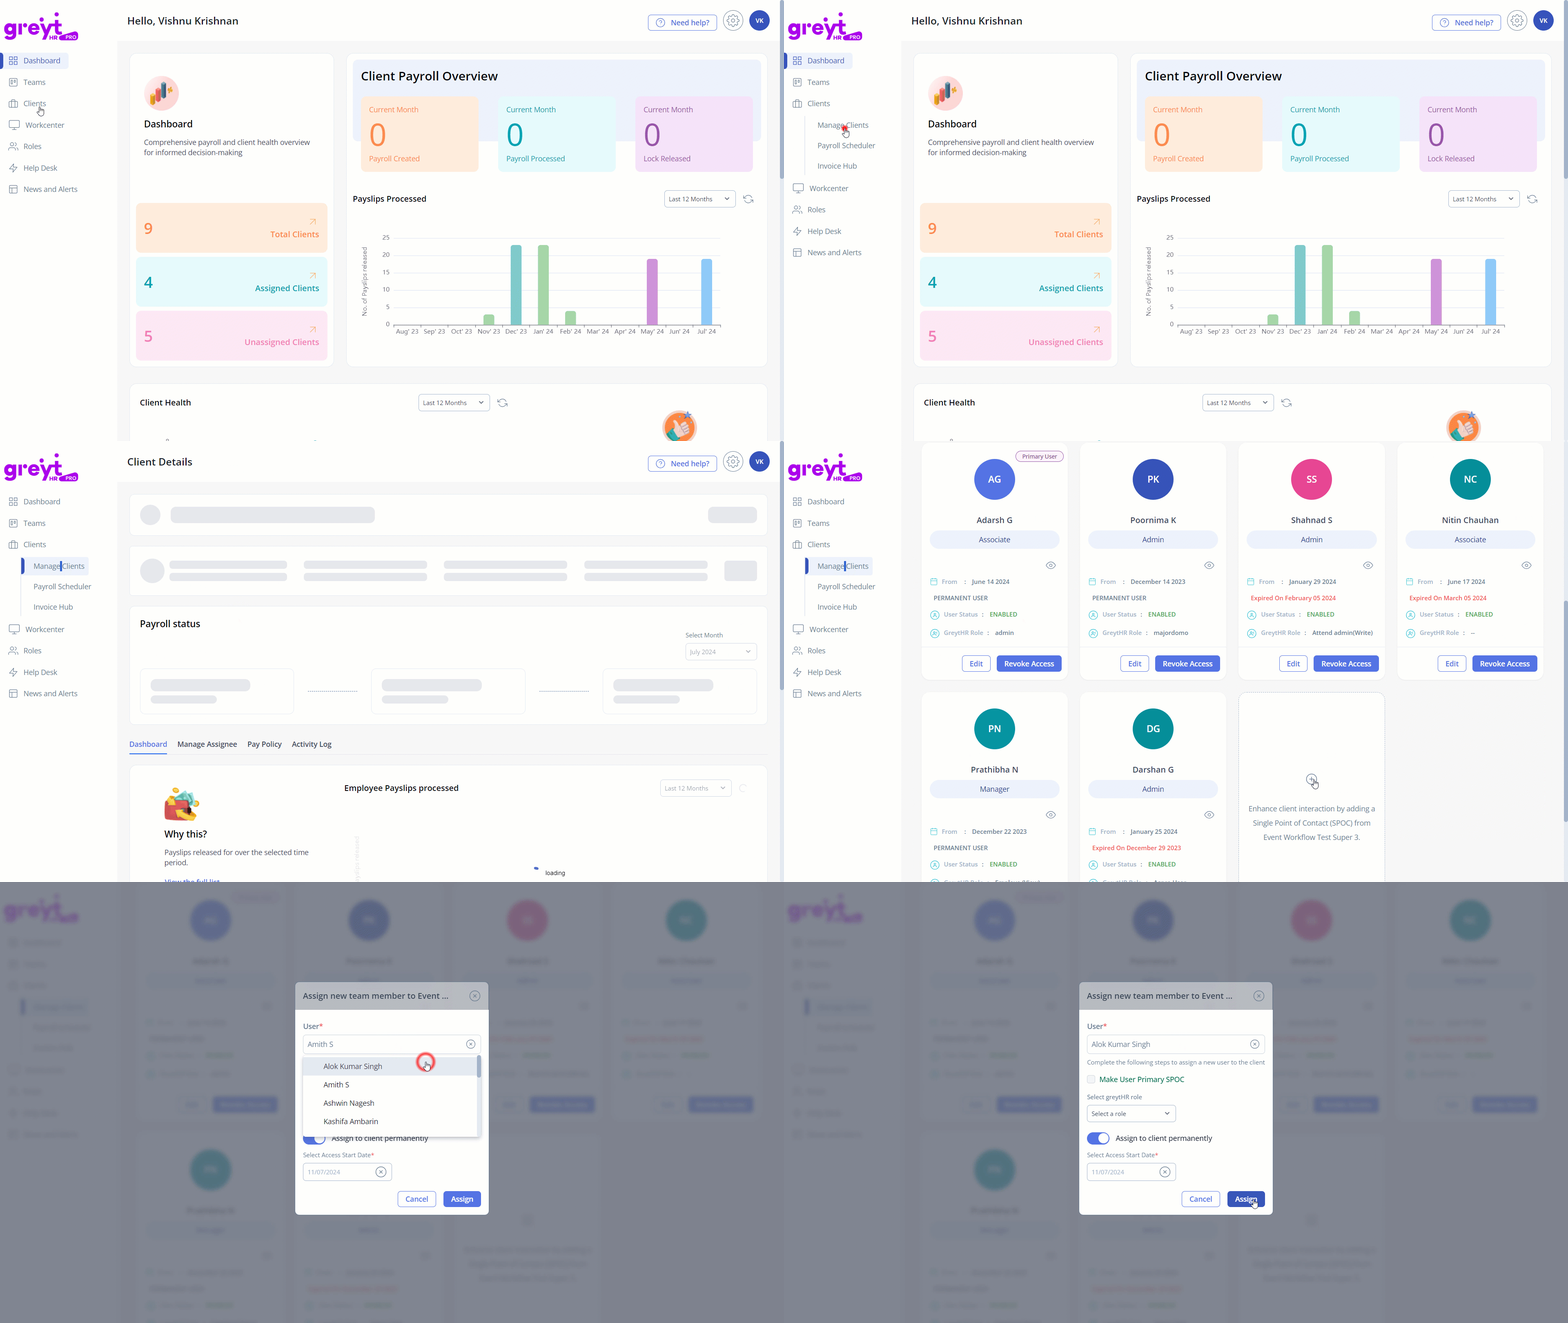
From the greytHR PRO account, navigate to Clients. The Clients page opens.
Select and click the client to whom you want to assign a new team member. The Client Details page opens.
Click the Manage Assignee tab.
Click the + icon available on the card. The Assign new team member to client pop-up appears.
From the User dropdown list, select the required user.
Select the Enable User Primary SPOC checkbox if you want to make the new user as a primary SPOC for the client.
From the Select greytHR role dropdown list, select the required role.
Select the Assign to client permanently button if you want to assign the new user permanently to the client.
From the Access Date Range dropdown calendar, select the required date range.
Click Assign to assign a new team member to the selected client. A success message appears and the card displays all the selected details.
Note: You can also edit and revoke access by clicking the Edit and Revoke Access icons.
Other related links:
Was this article helpful?
More resources:
▶ Video - Watch our how-to videos to learn more about greytHR.
❓ FAQs - Solve your queries using FAQs.
📢 Product Update - Read about the product updates.