Email-based approval for workflow request
Updated in July-2025 | Subscribe to watch greytHR how-to video
Approvals are a vital part of every HR workflow, from processing leave and attendance requests to handling reimbursements or travel applications. However, if the reviewer is required to log in for each action, it often leads to delays.
greytHR’s Email-Based Approval helps reviewers to approve, reject, or forward requests right from their inbox—no login delays, faster workflows. This greatly improves turnaround time and enhances overall workflow efficiency.
This feature is currently available for the Leave and Attendance modules and will soon be extended to other workflows such as travel, reimbursements, and more.
Types of requests for email approval
Currently, reviewers can act on the following workflow requests via email:
Leave-related requests
All leave types under Leave Applications
Leave Cancellations
Restricted Holiday (RH) Requests
Leave Grant
Leave Encashment
Apply on Behalf (Manager/Admin)
Attendance-related requests
Permission & Regularization
Overtime
Apply on Behalf (Manager/Admin) for attendance types
Enable email-based approval
The first step towards enabling email-based approvals is to enable the email-based approval feature.
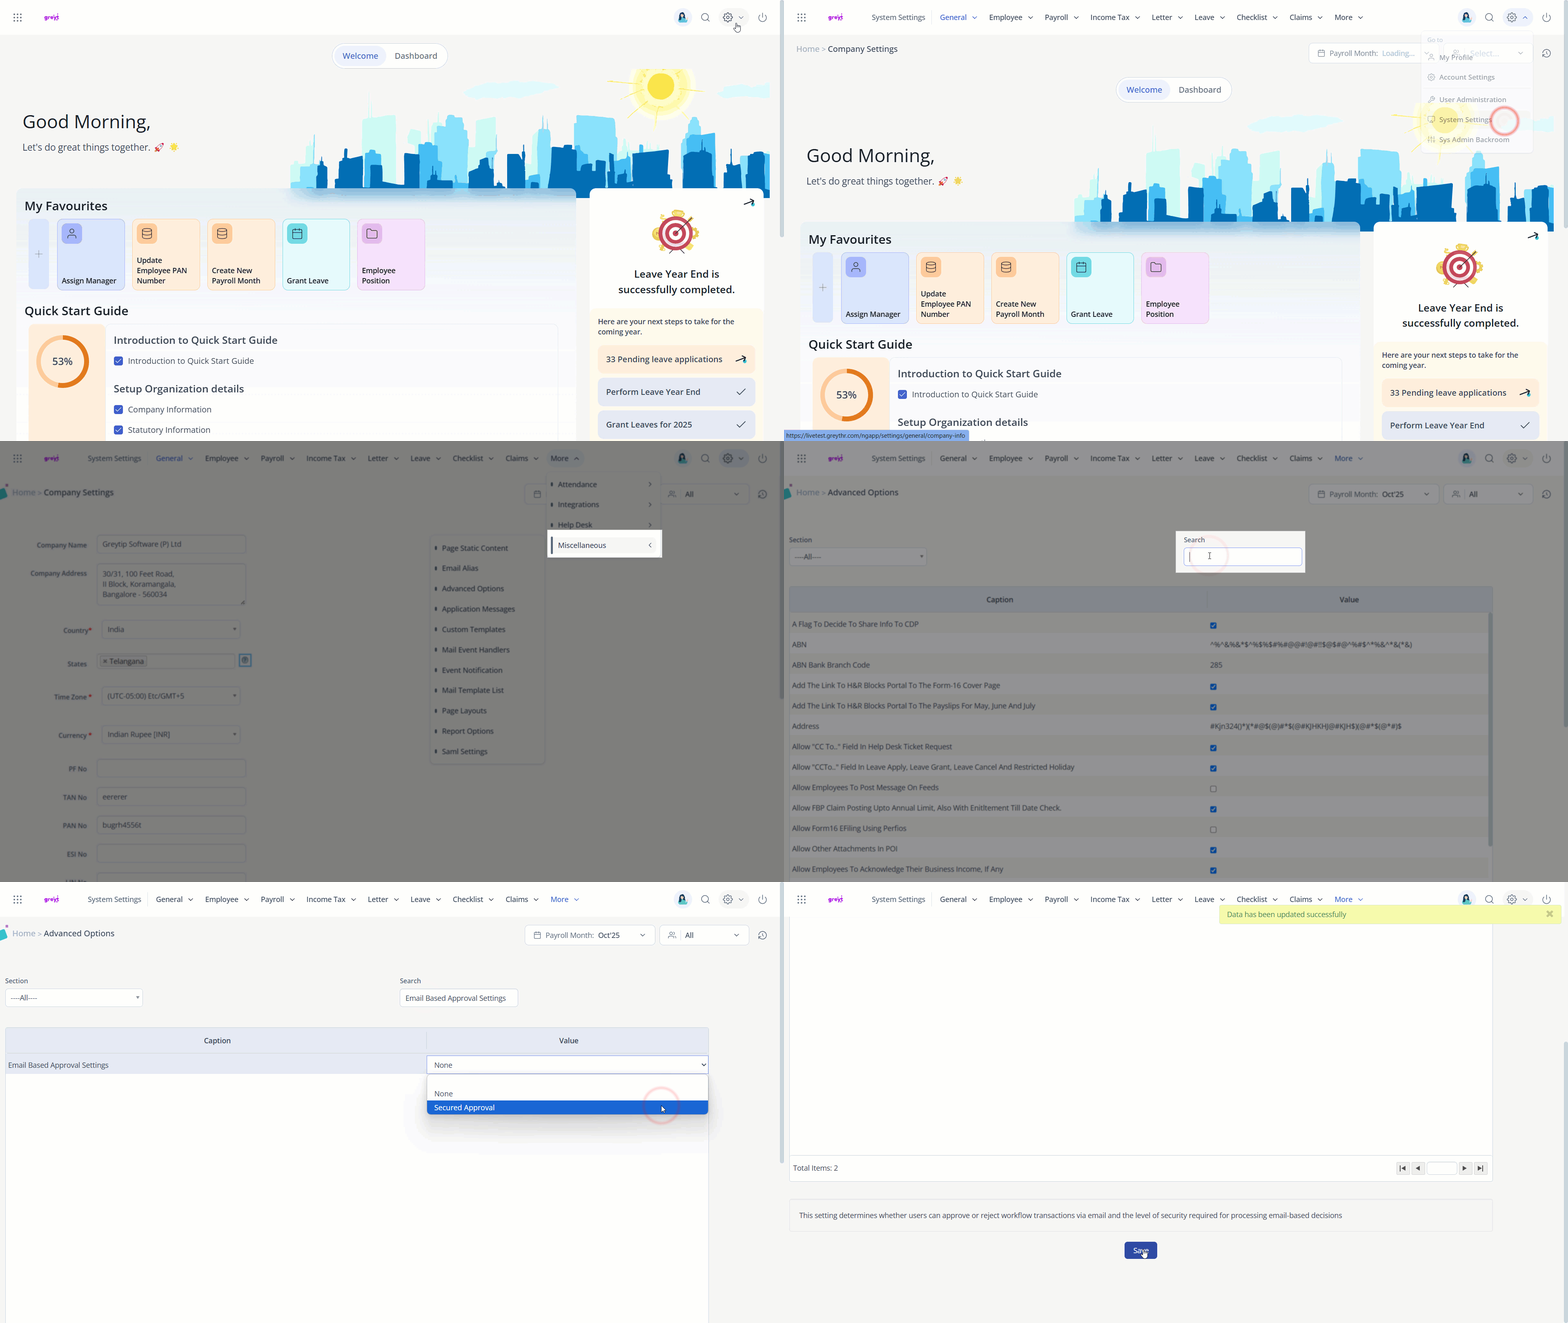
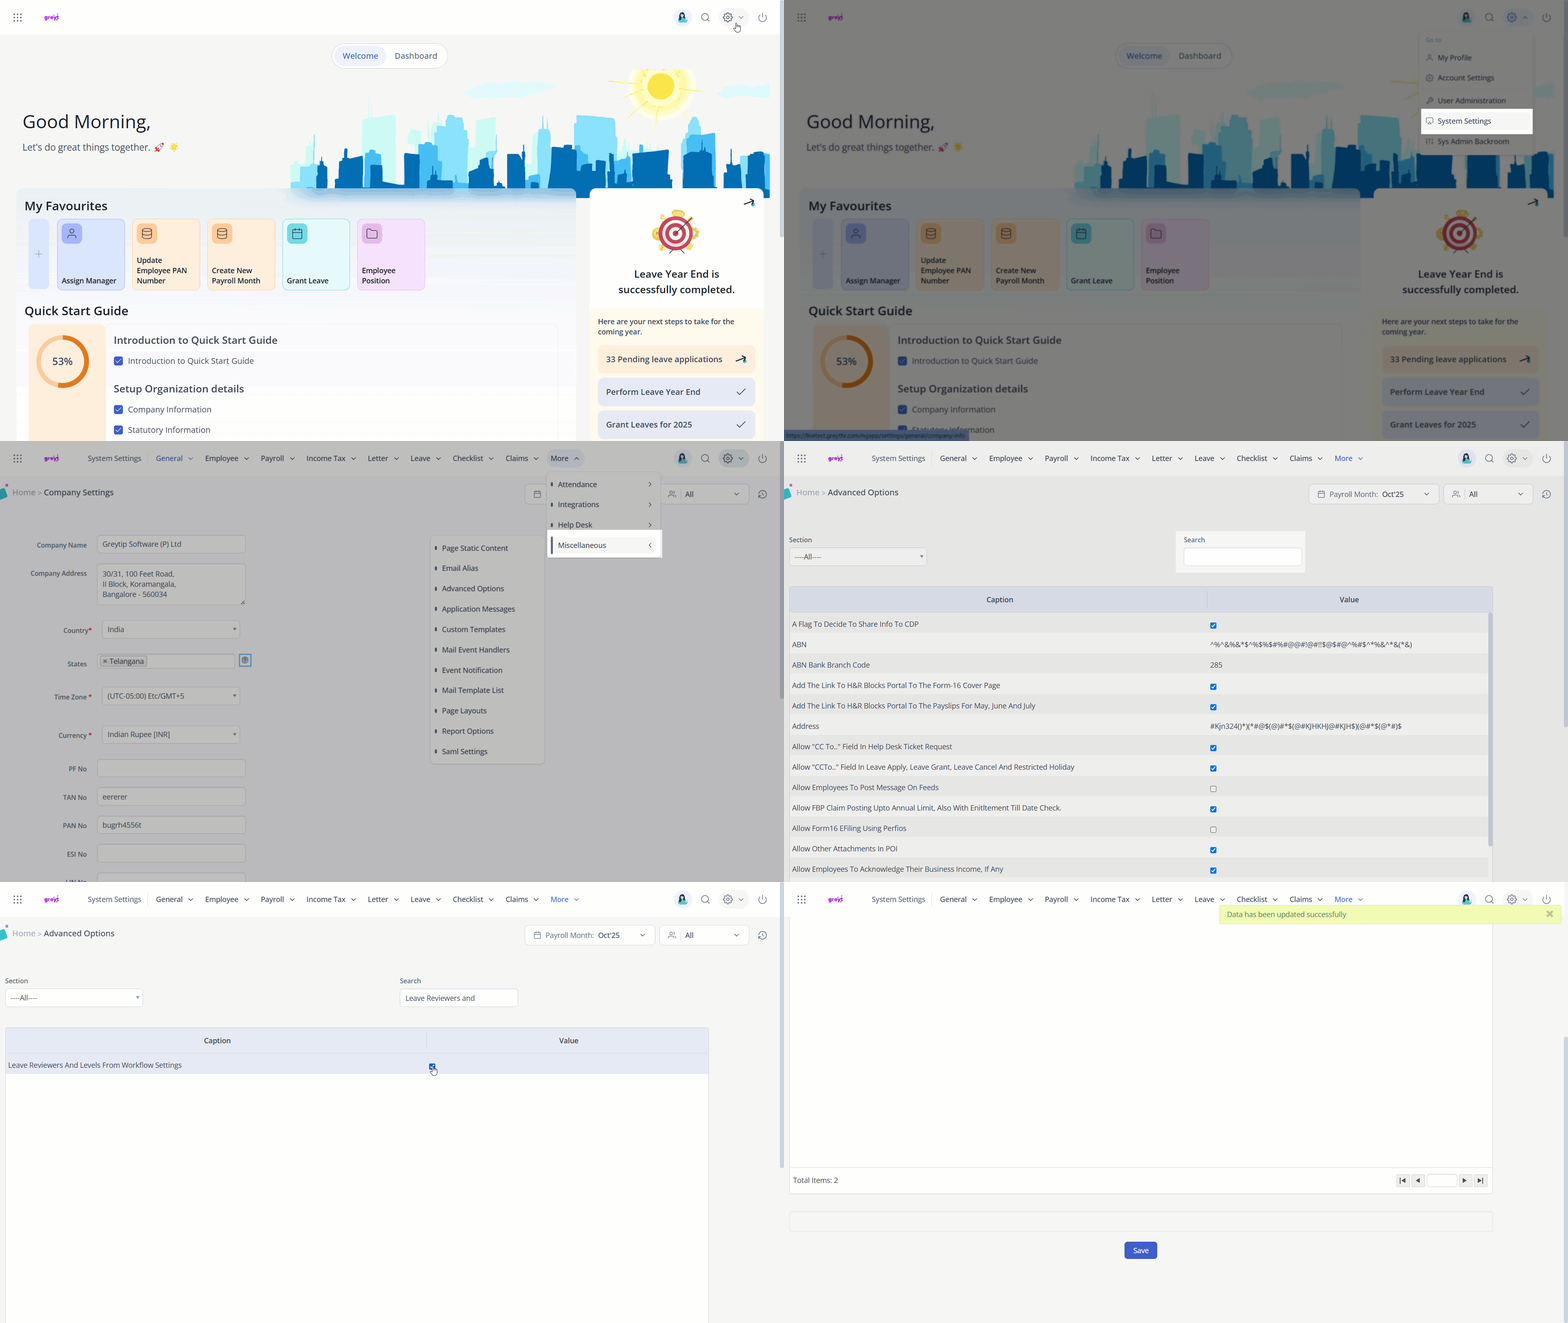
To enable the email-based approval feature for any supported workflow, go to Settings > System Settings > Miscellaneous > Advanced Options in the greytHR Admin portal.
Search for Email-Based Approval Settings option.
In the Value section, double-click and set it to Secured Approval.
Additional settings
For Leave workflows:
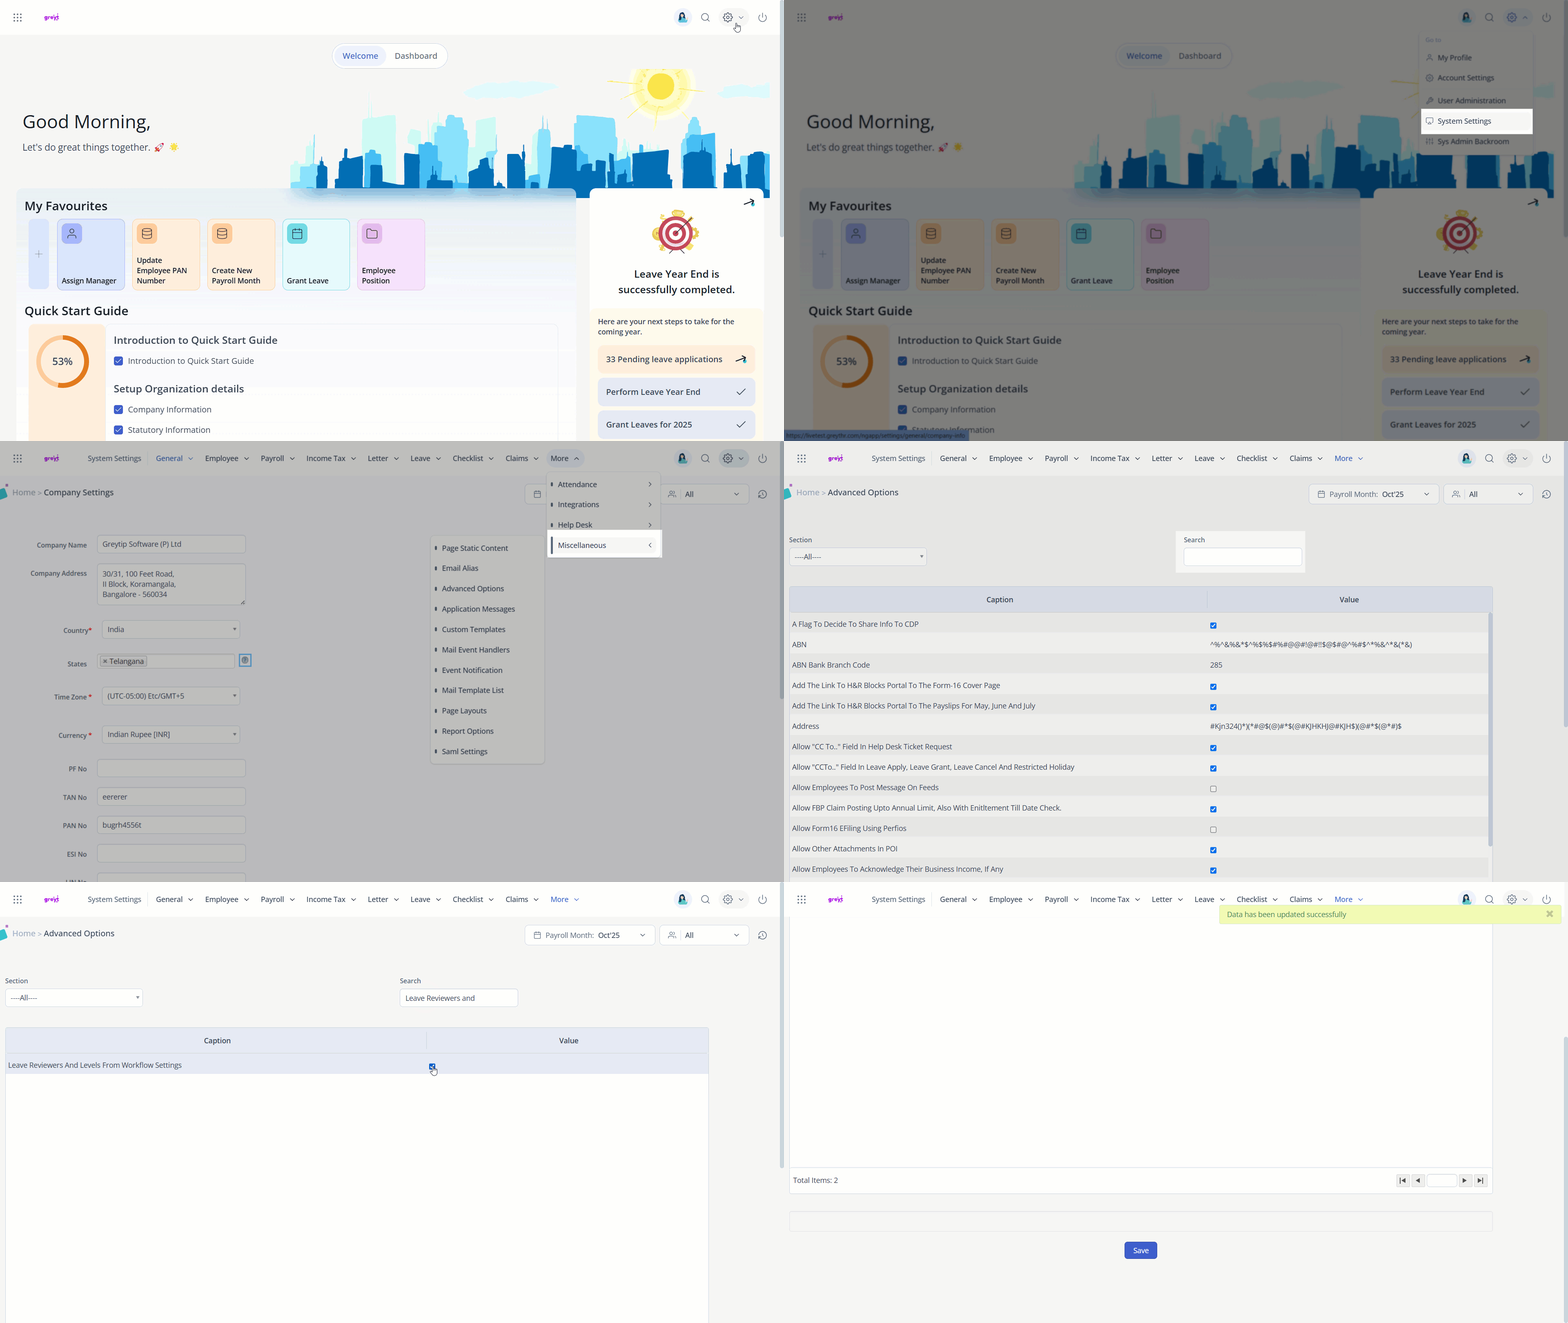
You need to enable Leave Reviewers and Levels under Workflow Settings on the same page.
For Attendance workflows:
No additional toggle is required here, but workflow levels must be properly configured.
After enabling the feature, let’s see how email-based approval works in greytHR
Email-Based Approval process in greytHR
When an employee submits any request (e.g., any leave, permission and regularization, or overtime application), the assigned reviewer receives an email containing CTA buttons such as Approve, Reject, or Forward. The available actions depend on the reviewer’s permissions:
Reject is shown by default to all reviewers.
Approve and Forward appear only if the reviewer has the corresponding permissions.
Authentication Flow:
If the reviewer is logged in greytHR, clicking the action in the email completes the workflow immediately and displays a confirmation message.
If not logged in, the reviewer is redirected to the greytHR login page. After logging in, they must return to the email and click the action again to complete it.
Note: Bulk actions are not supported. Each request must be addressed individually.
To make sure the email-based approval feature works smoothly, it’s important that the email templates are correctly set up.
Updating custom email templates to include new CTA buttons
As an admin, you can update custom email templates to include new CTA buttons for a specific workflow in greytHR.
If you are editing an existing template, make sure to add the required HTML lines in the body of the email template.
The following lines must be added manually to the template at the end of the email body.
#foreach( $action in $emailActions ) <a href="${action.actionUrl}" style="${action.style}">${action.actionName}</a> #end <br/><br/>
Or, if your current template doesn't include these lines, you must manually add them.
This is necessary for the Call-to-Action (CTA) buttons to appear in the emails when email-based approval is enabled.
If the CTAs still don’t show up, check the Secured Approval configuration to ensure it's set up correctly.
If it still doesn't show up as a final step,
First, delete the existing template for the new template to reflect from the Settings icon > System Settings > Miscellaneous > Mail Template List.
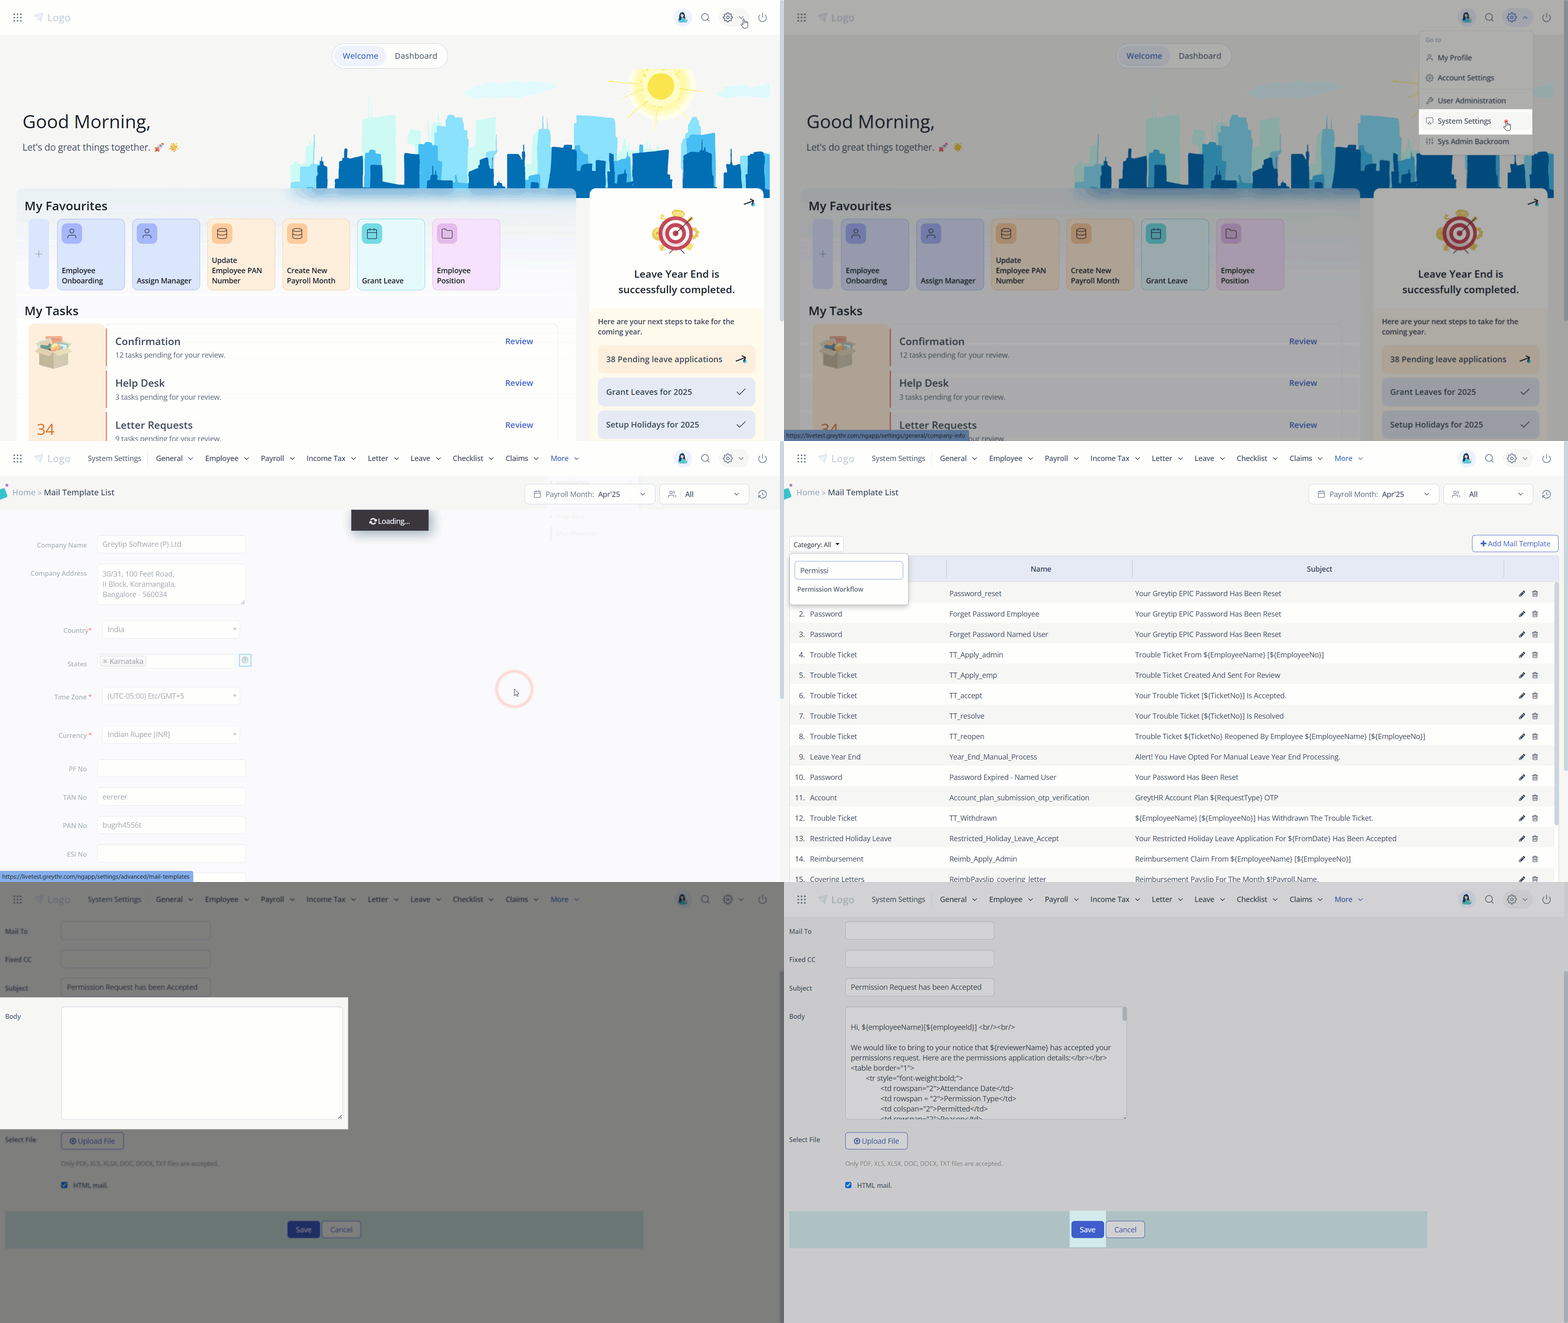
Then, go to Account Settings > New Features and disable and then re-enable the setting. This will restore the default template, which automatically includes the required lines.
Leave Management – Admin for leave workflows
Employee Attendance Permission for permission requests
Overtime for overtime approvals
Once re-enabled, the new template will take effect.
After email templates are correctly set and email-based approvals are working smoothly, you can further streamline the approval process by setting up auto-forwarding.
Setting up auto-forwarding for leave requests in greytHR
It is common for leave or attendance requests to get delayed due to inaction from reviewers. Auto-forwarding ensures that requests don’t stay stuck by automatically escalating them to the next level if a reviewer does not act within a specified period.
Auto-forwarding escalates requests if reviewers do not act within a specified period.
To set up auto forwarding for leave requests, from the greytHR Admin portal, go to System Settings > Leave > Leave Rules.
Select the relevant leave type and click Workflow Settings.
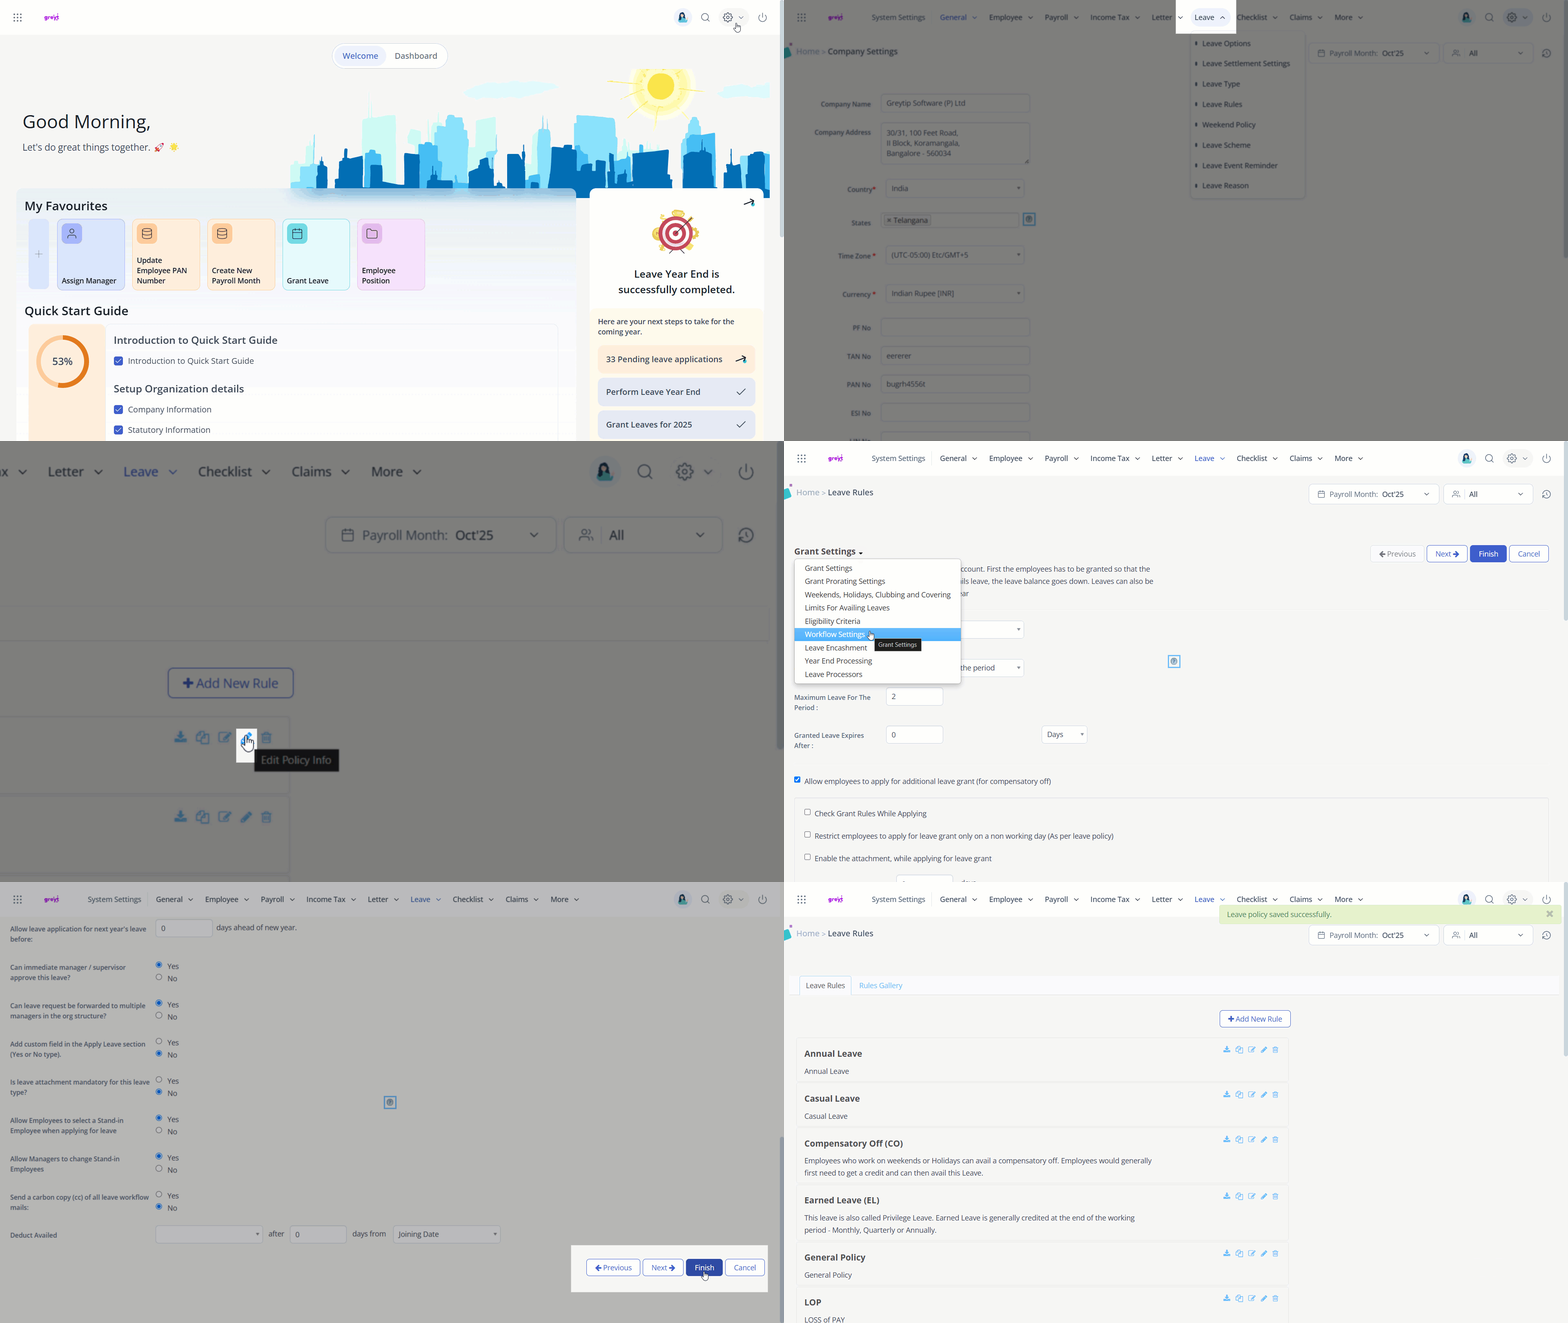
Under Auto-Forward Configuration, choose Yes for Is approval required when employee applies for leave?
Set the number of days after which the request should auto-forward and click Finish.
Setting up auto-forwarding for attendance requests (Permission/Overtime) in greytHR
To set up auto forwarding for leave requests, go to Workflows > Setup > Workflow Levels.
Click Add Workflow Level and select the workflow type (e.g., Permission, Overtime).
Enable the Auto-Forward checkbox for multiple-level workflows.
Note: Once auto-forwarded, the previous reviewer can no longer take action.
While using email-based approvals and auto-forwarding features, reviewers may sometimes encounter certain error messages or system prompts.
Error messages and system prompts
While acting on workflow requests via email or within the system, reviewers may come across different error messages depending on the situation.
For example, if a reviewer is not authorized to take action or their rights have been revoked, the system displays the message: “You are not allowed to review this application.”
If another reviewer has already acted on the request, they may see: “This request is no longer available.”
In cases where the reviewer has already submitted a response, the system shows: “You’ve already reviewed this request.” Lastly,
if the request is not part of their assigned workflow, they may encounter the message: “This request is not assigned to you.”
Email-Based Approval: Frequently Asked Questions
What is email-based approval in greytHR?
Email-based approval is a feature that allows reviewers to take action—Approve, Reject, or Forward—on workflow requests directly from their email inbox, without needing to log into the greytHR portal.
Does the reviewer need to log in to approve or reject a request?
If the reviewer has already logged in to greytHR its not required to log in every time to review the request. With the Email-Based Approval feature, they can approve, reject, or forward requests directly from their email inbox.
Can the reviewer take action on the request without logging in?
If the reviewer is not logged in, they will be redirected to the greytHR login page. Once logged in, they need to return to the original email and click the action button again to complete the process.
What kind of workflow requests are supported for email-based approval?
Currently, the feature supports the following:
Leave-Related Requests:
All types of leave applications, leave cancellations, restricted holiday (RH) requests, leave grant, leave encashment, apply on Behalf (Manager/Admin)
Attendance-Related Requests:
Permission Requests, regularization requests, overtime applications, and apply on behalf (Manager/Admin) for attendance types.
How to enable email-based approval in greytHR?
To enable the email-based approval feature for any supported workflow, go to Settings > System Settings > Miscellaneous > Advanced Options in the greytHR Admin portal.
Search for Email-Based Approval Settings option.
In the Value section, double-click and set it to Secured Approval.
Additional Settings
For Leave workflows:
You need to enable Leave Reviewers and Levels under Workflow Settings on the same page.
For Attendance workflows:
No additional toggle is required here, but workflow levels must be properly configured.
How does email-based approval work in greytHR?
When an employee submits any request (e.g., any leave, permission and regularization, or overtime application), the assigned reviewer receives an email containing CTA buttons such as Approve, Reject, or Forward. The available actions depend on the reviewer’s permissions:
Reject is shown by default to all reviewers.
Approve and Forward appear only if the reviewer has the corresponding permissions.
Authentication Flow:
If the reviewer is logged in greytHR, clicking the action in the email completes the workflow immediately and displays a confirmation message.
If not logged in, the reviewer is redirected to the greytHR login page. After logging in, they must return to the email and click the action again to complete it.
Note: Bulk actions are not supported. Each request must be addressed individually.
How to update custom email templates to include new CTA buttons?
As an admin, you can update custom email templates to include new CTA buttons for a specific workflow in greytHR.
If you are editing an existing template, make sure to add the required HTML lines in the body of the email template.
The following lines must be added manually to the template at the end of the email body.
#foreach( $action in $emailActions ) <a href="${action.actionUrl}" style="${action.style}">${action.actionName}</a> #end <br/><br/>
Or, if your current template doesn't include these lines, you must manually add them.
This is necessary for the Call-to-Action (CTA) buttons to appear in the emails when email-based approval is enabled.
If the CTAs still don’t show up, check the Secured Approval configuration to ensure it's set up correctly.
If it still doesn't show up as a final step,
First, delete the existing template for the new template to reflect from Settings icon > System Settings > Miscellaneous > Mail Template List.
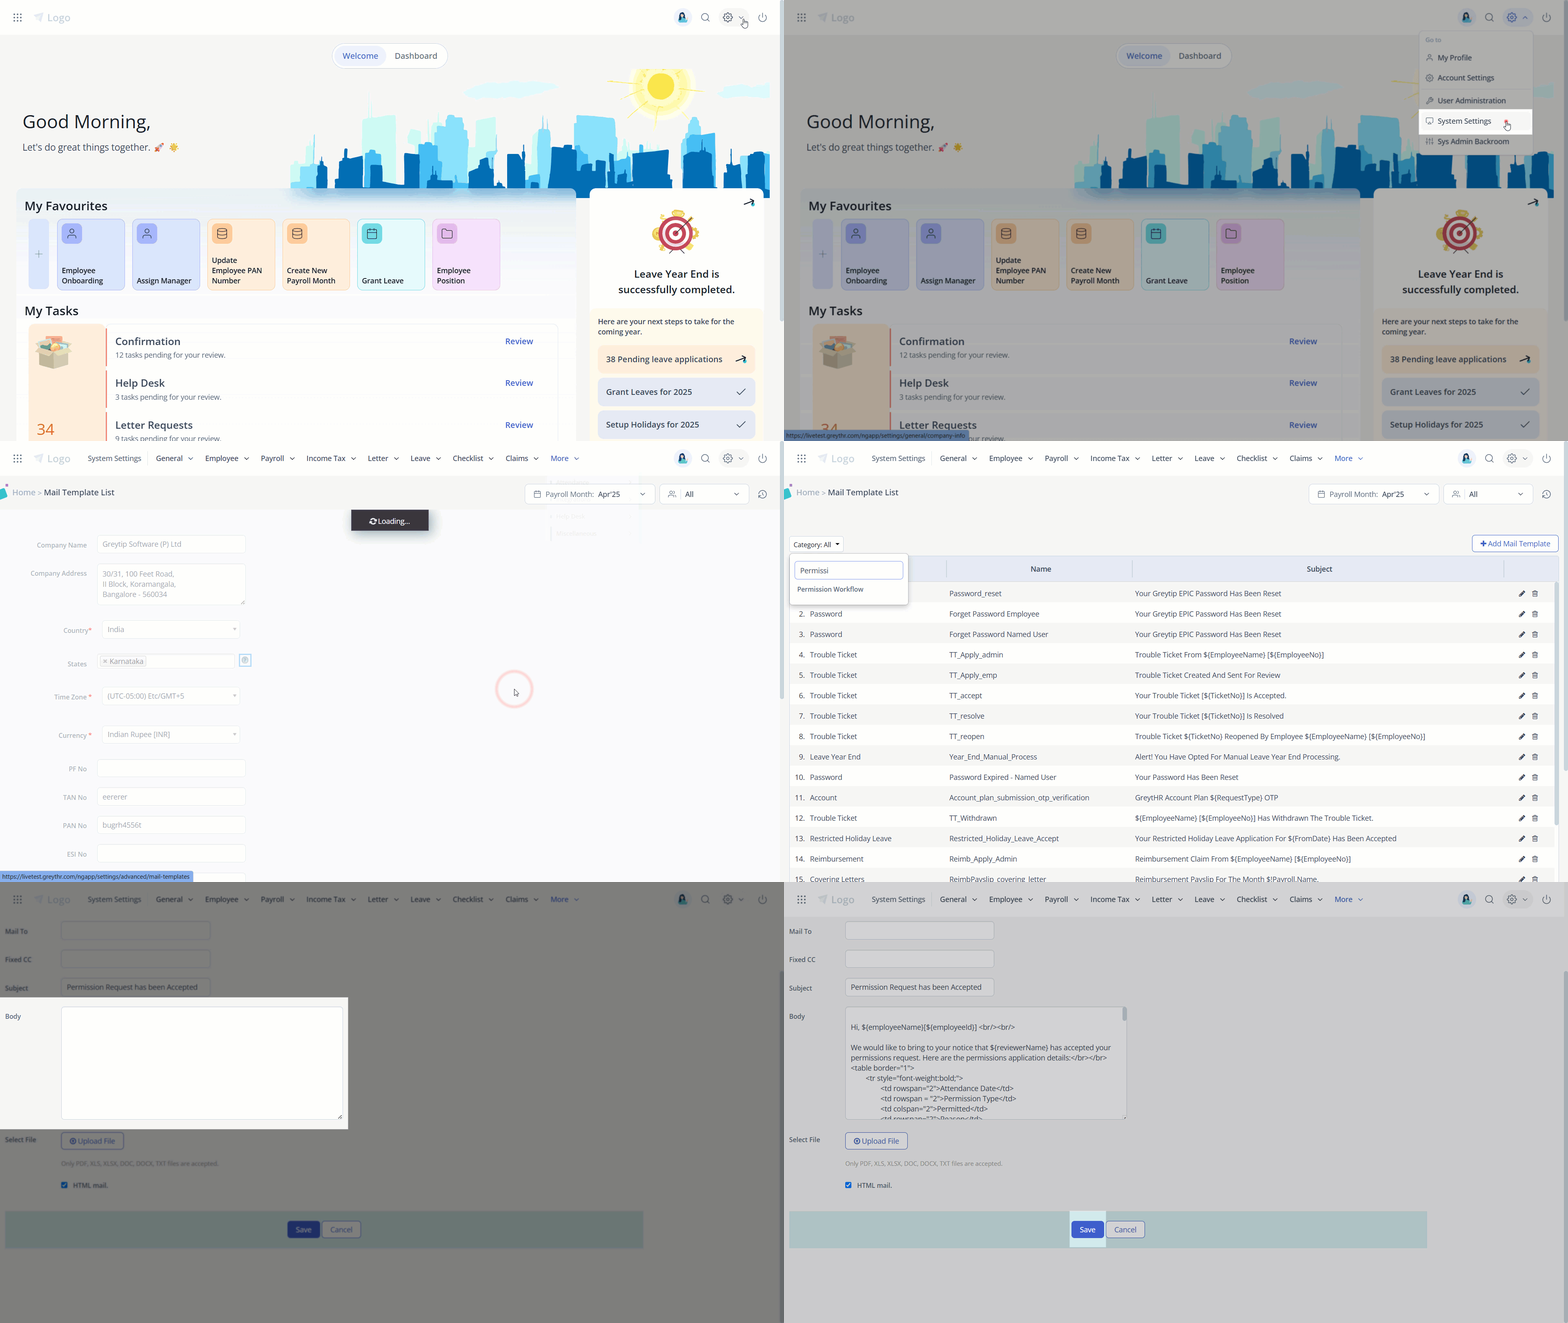
Then, go to Account Settings > New Features and disable and then re-enable the setting. This will restore the default template, which automatically includes the required lines.
Which email templates need to be configured for email-based approvals?
The following templates are used for different types of approvals:
Leave Management – Admin (for leave workflows)
Employee Attendance Permission (for permission requests)
Overtime (for overtime approvals)
What is auto-forwarding and why is it useful?
Auto-forwarding ensures that requests don’t remain stuck with inactive reviewers.
If a reviewer doesn’t take action within a configured period, the request automatically moves to the next level of review.
How to set up auto-forwarding for leave requests in greytHR?
It is common for leave or attendance requests to get delayed due to inaction from reviewers. Auto-forwarding ensures that requests don’t stay stuck by automatically escalating them to the next level if a reviewer does not act within a specified period.
Auto-forwarding escalates requests if reviewers do not act within a specified period.
To set up auto forwarding for leave requests, from the greytHR Admin portal, go to System Settings > Leave > Leave Rules.
Select the relevant leave type and click Workflow Settings.
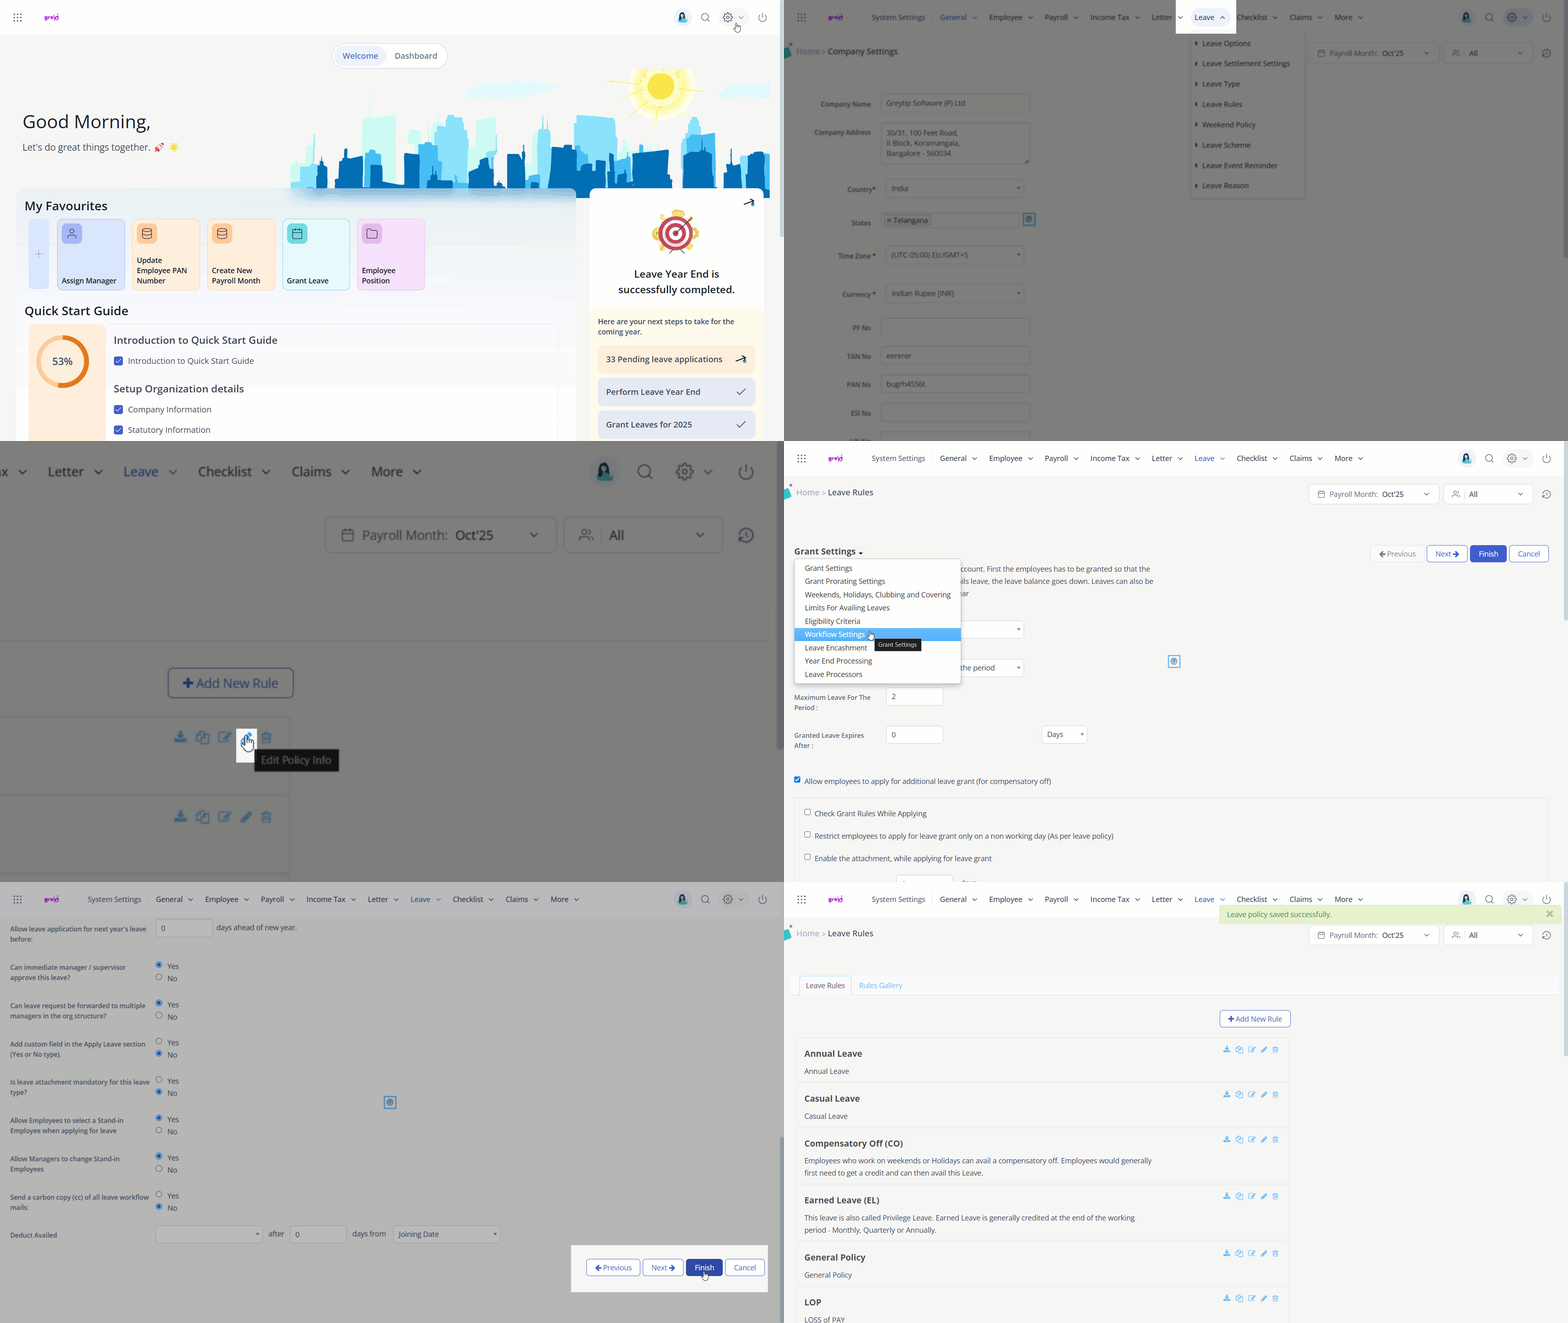
Under Auto-Forward Configuration, choose Yes for Is approval required when employee applies for leave?
Set the number of days after which the request should auto-forward and click Finish.
How to set up auto-forwarding for attendance requests (Permission/Overtime) in greytHR?
To set up auto forwarding for leave requests, go to Workflows > Setup > Workflow Levels.
Click Add Workflow Level and select the workflow type (e.g., Permission, Overtime).
Enable the Auto-Forward checkbox for multiple-level workflows.
Note: Once auto-forwarded, the previous reviewer can no longer take action.
What error messages or system prompts do reviewers encounter?
While acting on workflow requests via email or within the system, reviewers may come across different error messages depending on the situation.
For example, if a reviewer is not authorized to take action or their rights have been revoked, the system displays the message: “You are not allowed to review this application.”
If another reviewer has already acted on the request, they may see: “This request is no longer available.”
In cases where the reviewer has already submitted a response, the system shows: “You’ve already reviewed this request.” Lastly,
if the request is not part of their assigned workflow, they may encounter the message: “This request is not assigned to you.”
Related Articles:
Understand Regularization and Permissions workflow
Monitor employees workflow requests
Was this article helpful?
More resources:
▶ Video - Watch our how-to videos to learn more about greytHR.
📢 Product Update - Read about the product updates.