Map PF KYC documents
Updated in September- 2024 | Subscribe to watch greytHR how-to video
PF KYC mapping refers to the process of linking an employee's Know Your Customer (KYC) details with their Provident Fund (PF) account. KYC details typically include information such as the employee's name, address, date of birth, and Aadhaar number, among others.
The purpose of PF KYC mapping is to ensure that the PF contributions made by the employer on behalf of the employee are accurately credited to their PF account. By verifying the employee's KYC details, the employer can confirm the employee's identity and ensure that their PF contributions are being credited to the correct account.
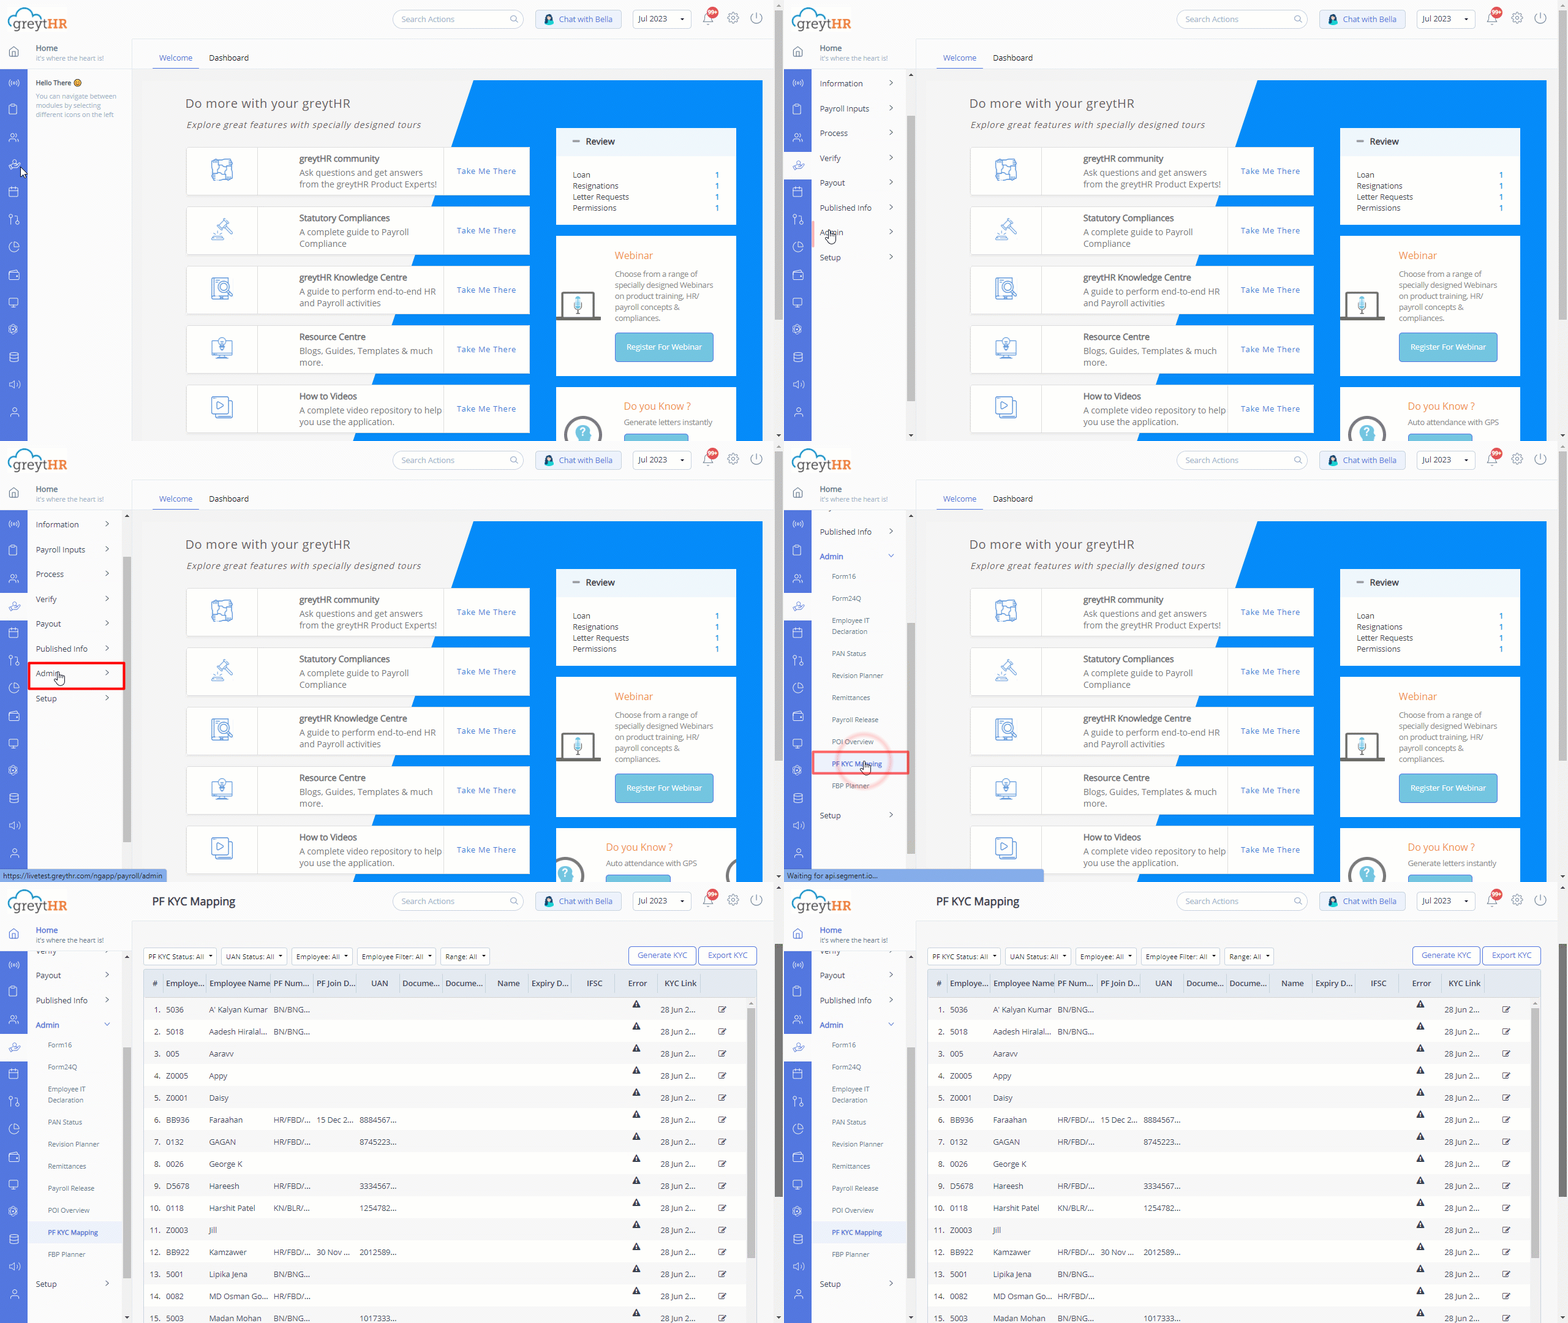
The PF KYC Mapping page in the greytHR Admin portal helps you to generate the text file, which you must upload to the EPFO website. Uploading the file is the statutory requirement by the PF Board to complete PF KYC. The page displays a list of employees based on the various filters available. You can view many PF-related details of the employees, such as PF Number, PF Join Date, UAN number, and Document Type.
To view the PF KYC Mapping page, navigate to Payroll > Admin > PF KYC Mapping.

You can perform the following actions on the PF KYC mapping page:
Generate KYC report.
Unlink KYC for all employees.
Link an employee's KYC document.
Export KYC report.
Map PF KYC report
The complete PF KYC mapping process consists of the following steps:
Upload employees' UAN numbers in the greytHR database. You can upload the employees' UAN numbers on the Employee > Information > Bank/PF/ESI page.
Update employee identity details. You can update the employee identity details on the Employee > Information > Employee Profile page.
Mark employees' documents as verified. You can mark employees' documents as verified on the Employee > Admin > Identity Verification page.
Generate KYC text file for each document type individually.
After you have generated individual text files for each document type, upload the text files to the EPFO portal to complete the PF KYC mapping process.
Generate KYC report
To generate the KYC text file for a doc type, perform the following actions:
From the greytHR Admin portal, navigate to Payroll > Admin > PF KYC Mapping.
On the PF KYC Mapping page, from the PF KYC Status dropdown list, select Available.
Click Generate KYC to download the text file to your system.
Note: You can link only one document at a time.
Unlink KYC for all employees and repeat the process of generating KYC for the second document. Repeat the process for all the required KYC documents one by one.
Unlink KYC for all employees
To unlink KYC for all the employees, perform the following actions:
On the PF KYC Mapping page, click Unlink KYC. Unlink KYC pop-up appears.
Click Confirm. A success message appears.
Link an employee's KYC document
To link an employee's KYC document, perform the following actions:
From the greytHR Admin portal, navigate to Payroll > Admin > PF KYC Mapping.
On the PF KYC Mapping page, from the PF KYC Status dropdown list, select Not Available.
Using the Employee, Employee Filter, and Range dropdown filters, search for the employee to whom you want to link the KYC document.
Click the Edit icon available on the selected employee's row. Modify KYC Link pop-up appears.
Select the required Doc Type and click Submit. A success message appears.
Note: You can link only one document at a time.
Export KYC report
To download the KYC report of the employees available in the list, perform the following actions:
From the greytHR Admin portal, navigate to Payroll > Admin > PF KYC Mapping.
On the PF KYC Mapping page, using the Employee, Employee Filter, and Range dropdown filters, customize the list of employees based on your requirements.
Click Export KYC to download the report in Excel format.
Other related links:
Was this article helpful?
More resources:
▶ Video - Watch our how-to videos to learn more about greytHR.
❓ FAQs - Solve your queries using FAQs.
📢 Product Update - Read about the product updates.