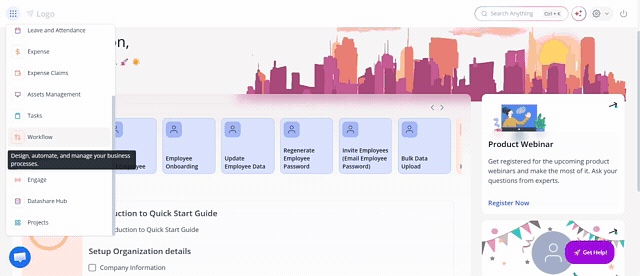
Onboarding new employees
Updated in February - 2026 | Subscribe to watch greytHR how-to video
Employee onboarding helps HR admins smoothly integrate new hires by providing the required resources and information. It begins before the employee’s first day and may continue for weeks or months, depending on the role and company.
Watch the video to learn how to manage the employee onboarding process.
The employee onboarding process includes:
Configuration of the onboarding form.
Start onboarding a new employee.
Rehire a former employee as a new employee.
Initiate onboarding from Employee Onboarding page for new and existing employees.
Remind employees to submit the onboarding details.
Review the employee onboarding submissions.
Get started with the employee onboarding form
greytHR's Employee Onboarding feature enables admins to configure onboarding forms, review and approve/reject employee details, define required document types, and ensure employees acknowledge policies and forms during the onboarding process for a smooth onboarding experience.
For a seamless employee onboarding experience:
Configure the employee onboarding form.
Customize the document list in the employee onboarding form.
⚠️We recommend that you to contact the greytHR support team before making any changes in settings.
Configure the employee onboarding form
The employee onboarding form allows you, as an admin, to configure documents, attachments, and verifications according to your organization's policies. You can also specify if these fields are mandatory or optional, ensuring employees provide the necessary information during onboarding.
To configure the employee onboarding form from the greytHR Admin portal, go to the Settings icon > System Settings > Employee > Employee onboarding.

In the Employee Information Settings tab, configure the employee onboarding form by specifying sections such as Personal Information, Previous Employment, Accounts & Statutory, Family Details, and Nomination Details. You can also set fields as Display or Mandatory, allowing employees to either view or compulsorily provide the required details.
Finally, click Save to apply your settings.
ℹ️Customize the Accounts & Statutory section to allow employees to add their Insurance and Registration Details.
Customize the document list in the employee onboarding form
To create and configure document types for the employees from the greytHR Admin portal, go to the Settings icon > System Settings > Employee > Employee onboarding.

Click the Employee Document Settings tab.
Create a new document type:
Click Create Document Type.
Enter the Document Title.
Select a Category from the dropdown (or create a new category from Employee Documents or List of Values page and select Emp Doc Category).
Add Instructions and select Mandatory if submission is required.
Click Create.
Set mandatory documents:
After creating the document type, you can mark the Mandatory column to designate required document types and save it.
Note: Use the Kebab Menu (⁝) next to a document type to edit or delete.
After you have successfully configured the employee onboarding form, you can add new employees and initiate the onboarding process simultaneously.
Start onboarding a new employee
If you are using greytHR’s onboarding feature, then you can initiate the onboarding process for the new employee while adding the details to the system.
Watch our video to learn how to add new employees.
To add or onboard a new employee, from your greytHR Admin portal, select Add Employee from the NAVOS search bar.
Note: Alternatively, you can add a new employee from the Analytics Hub page by clicking the Add Employee option.
In the add employee wizard, start updating the employee details.
Basic Information
Employee Position
Statutory Info
Payment Mode
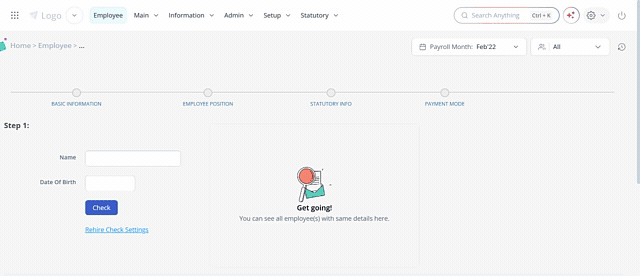
Note: If you’ve enabled the greytHR Rehire Check feature from System Settings, greytHR lets you check if you are hiring a former employee using the employee’s Aadhar and PAN number. Make sure to remove the separation details before proceeding.
Now, let’s begin with adding a new employee.
Under Step 1: Basic Information section, enter the basic details of the employee.
We recommend filling in as many details as possible while adding the employee. If not, do not worry; you can always add them later.Select Allow the employee to fill in their information check box to allow the employee to fill in their information during onboarding.
Note: At this stage also, you can customize the Employee Onboarding Form by clicking the Employee Onboarding Policy option. This helps to ensure that you collect all the necessary information from new hires.Click Next. Step 2: Employee Position form opens.
Under the Employee Position section, add the employee details such as Designation, Department, Grade, Location, and Attendance Scheme.
Click Next. Step 3: Statutory Info form opens.
Enter employee details such as PAN Number, PF Number, and UAN Number.
Select an appropriate PF Excess Contribution option.
Click Next. Step 4: Payment Mode form opens.
Under the Payment Mode section, select the appropriate payment method.
Click Finish to complete adding a new employee.
Note: You can revisit the previous steps before you finish. If you click Cancel, then you will lose unsaved changes.Click Close in the summary message to confirm adding an employee, or click Add Another Employee to add another new employee.
Rehiring a former employee as a new employee
With greytHR, you can also rehire any former employee. Rehiring refers to a situation where a former employee who had previously resigned wishes to come back and rejoin the organisation.
greytHR's Rehire Check feature streamlines the process of re-hiring former employees by verifying their previous records, ensuring data consistency, and preventing duplication.
Watch this video to understand how the Rehire feature works:
Let us take a look at the steps to add a former employee back to the system:
Configure employee Rehire Check settings
Remove an employee’s separation details
Rehire a former employee
Configure employee Rehire Check settings
The Employee Options page in the greytHR Admin portal enables you as an admin to configure the RehireCheck settings.
To view the Employee Options page, navigate to the Settings icon > System settings > Employee > Employee Options.
You can perform the following actions on the Employee Options page:
Enable/Disable the Rehire Check feature.
Customize mandatory fields for the Rehire Check feature.
Select the mandatory fields to copy to the employee information.
Note: We recommend that you contact the greytHR support team before making any changes to settings.
Enable/Disable RehireCheck feature
When you disable the RehireCheck feature, as an admin, you will not be able to view the Rehire Check step on the Add Employee page while adding an employee to the database.
To enable/disable the rehirecheck feature, perform the following actions:
From the greytHR Admin portal, navigate to the Settings icon > System settings > Employee > Employee Options.
On the Employee Options page, select/deselect the Enable Rehire Check in Add Employee checkbox to enable/disable the Rehire Check option.
Click Save to update the changes.
Note: The Enable Rehire Check in Add Employee checkbox is enabled by default for customers. If the option is disabled, you will not be prompted to proceed further with the customization below.
Customize mandatory fields for Rehire Check feature
By default, the Aadhaar number field is selected as mandatory. However, you can also add additional mandatory fields to validate while you are adding an employee to the database.
To customize the mandatory fields for the Rehire Check feature, perform the following actions:
From the greytHR Admin portal, navigate to the Settings icon > System settings > Employee > Employee Options.
On the Employee Options page, from the Select criteria for Rehire Check field, select the required mandatory fields that you want to validate to add an employee.
Click Save to update the changes.
Select mandatory fields to copy to employee information
While adding an employee to the database, after the Rehire Check step, the system will display the details of any resigned employees that match the current employee's details, if any. You can choose to copy the details of the resigned employee to continue adding the current employee.
The below configuration allows you to choose the mandatory fields that you want to copy from the displayed resigned employee's details.
To select mandatory fields to copy to employee information, perform the following actions:
From the greytHR Admin portal, navigate to the Settings icon > System settings > Employee > Employee Options.
On the Employee Options page, from the Select fields to copy after Rehire Check field, select the required details of the employee that you want to copy to the Basic Information section in the Add Employee form.
Click Save to update the changes.
Remove an employee’s separation details
When an employee leaves a company, various details related to their departure, such as the date of separation, the reason for leaving, final paycheck information, benefits termination, and any other relevant information, are usually recorded in the company's systems or employee files.
Removing an employee's separation details involves erasing or eliminating the information or records associated with an employee's separation from a company or organization.
In greytHR, before hiring a former employee, you need to remove the employee’s separation details to reactivate the employee’s profile. The Separation page in the greytHR Admin portal allows you, as an admin, to remove the separation details of an employee.
To remove the separation details of an employee, from the greytHR Admin portal, hover over the 9 dots and select Employee > Information > Separation.
On the Separation page, from the Employee Type dropdown list, select Resigned Employees.
In the Search Employee text box, search for the employee whose separation details you want to remove.
Under the Resignation Status section, from the Separation Mode dropdown list, select Resigned.
Clear all the details from the Resignation Details, Exit Interview, and Exit Details sections. Once all the separation details are removed, the employee profile is reactivated.
Rehire a former employee
Once you’ve completed the configuration of the Rehire Check feature and removed the separation details of the former employee you wish to rehire, you can follow the same steps as adding a new employee.
The process will begin with the Rehire Check, where the system will identify if the person you’re adding is a former employee.
From the greytHR Admin portal, go to the NAVOS search bar, type Add Employee and click on the card.
Under Step 1: Rehire Check, enter the Name, Date Of Birth, Aadhaar Number, and PAN Number in their respective fields.
Note: For the default accounts, only the Aadhaar Number field will be visible.Click Check to check for any duplicate entries. A list of employee records matching with given details appears.
Note: The employee records include both exited and active employees.Click the > arrow on the relevant employee card to view the joining/exit details of the employee. The Rehire Check pop-up appears.
Click View Details to view the complete off-boarding details of the exited employee. For active employees, the View Details option will take you to the employee profile.
After checking all the required information, select the radio button on the exited employee card.
Note: By selecting the employee, you can continue adding the details of the employee.
Initiate employee onboarding from Employee Onboarding page for new and existing employees
If you are not using greytHR’s onboarding feature, then you can initiate the onboarding process for your employees from the Employee Onboarding page.
In greytHR, you can initiate the onboarding for:
Newly hired employees
Existing employees
Initiate the onboarding of new employees from Employee Onboarding page
To view the Employee Onboarding page, go to the NAVOS search box, and search for Employee Onboarding.
On the Employee Onboarding page, from the Status dropdown list, select Not Initiated. A list of employees appears for whom onboarding has not been initiated to date.
Select the employees using the checkbox adjacent to the employee's name.
Click Employee Onboarding Policy to check the configurations before initiating the onboarding process. This is a recommended step.
Click Initiate Onboarding. The Initiate Onboarding pop-up appears.
Click Confirm to initiate onboarding. A success message appears.
Other actions you can take:
Search for a specific employee: You can use the Employee dropdown list to search for a specific employee.
View status of EOB form: Under the Status dropdown list, along with Not Initiated, you can find the following status:
Active: The Active status displays a list of employees for whom the onboarding is initiated but not yet submitted by the employee.
Closed: The Closed status displays a list of employees for whom the onboarding submission is verified or withdrawn by the admin.
Release EOB form for red color employee row: If an employee row appears in red, that means that the email id for that employee is missing. To update the email id of an employee, navigate to Employee > Information > Employee Profile. After updating the email ID, you can release onboarding access to such an employee.
Reinitiate onboarding for existing employees from Employee Onboarding page
To re-initiate the onboarding for the employees, from the greytHR Admin portal, go to the NAVOS search box, and search for Employee Onboarding.
On the Employee Onboarding page, from the Status dropdown list, select Closed. A list of employees appears.
Select the employees using the checkbox adjacent to the employee's name.
Click Employee Onboarding Policy to check the configurations before initiating the onboarding process. Though this is not a mandatory step, we recommend checking the configurations before starting the onboarding process.
Click Initiate Onboarding. The Initiate Onboarding pop-up appears.
Click Confirm to re-initiate the onboarding for the employees. A success message appears.
Note: After the employees' onboarding process is successfully initiated, the employee status changes from Not Initiated/Closed to Active on the Employee Onboarding page.
Review employee’s onboarding details
Reviewing employee onboarding details involves examining and evaluating the information and processes related to an employee's onboarding experience within an organization.
The Employee Onboarding page in the greytHR Admin portal displays the list of employee onboarding forms submitted by the employees. You can view the status of the applications and the date of submission.
To view the Employee Onboarding page, hover on the 9 dots and select Workflow > Modules > Employee Onboarding.

The page displays the following tabs:
Active: The Active tab displays the complete list of all employees for whom the onboarding form is released and must be verified.
Closed: The Closed tab displays the list of employees for whom the onboarding is Verified or Withdrawn.
The following actions can be performed on the Employee Onboarding page:
Review employees' onboarding details.
Remind the employee to submit onboarding details.
Withdraw an onboarding request.
Review employee’s onboarding details
After the employee submits their details, you must review and take appropriate actions, such as Accept/Reject the employee’s onboarding form.
On the Employee Onboarding page, under the Active tab, click the employee's card whose details you must verify.
Click Verify. The Verify Employee Onboarding page opens and displays the details submitted by the employee, categorized under various tabs.
You can Accept/Reject each piece of information individually. You can also add remarks in the Remarks text box. On Verify Employee Onboarding page, you can view the acknowledged company policies/forms under the tab Company Policies and Forms.
Post verification, click Resend/Submit. The Resend/Submit pop-up appears.
Note:You must ensure to either Accept or Reject the information under each section to submit the verification.
The Resend option allows you to resend only the sections requiring re-verification.
Select Notify employee to notify the employee.
Note:The approved information is updated in the application under Employee > Information.
You can view the verified and accepted document under Employee > Information > Employee Documents.
Employees can view and download the documents verified by you under Documents in their ESS portal. Employees also receive an email stating the rejected onboarding details along with remarks.
Employees must take action on the resent sections.
Remind the employee to submit onboarding details
You can remind an employee to complete the onboarding process. Perform the following actions to send a reminder to an employee:
On the Employee Onboarding page, under the Active tab, click the employee card to whom you want to send the reminder. The card expands.
Click Remind. The Remind pop-up appears.
Click Yes to send a reminder to the employee.
Withdraw an onboarding request
You can revoke the onboarding access given to an employee. Perform the following actions to withdraw onboarding access:
On the Employee Onboarding page, under the Active tab, click the employee card whose onboarding form you want to withdraw. The card expands.
Click Withdraw. The Withdraw pop-up appears.
Select Notify employee if you want to notify the employee.
Note: If Notify employee option is selected, an email is sent to the employee, informing him/her that their onboarding access has been withdrawn by the admin.Click Yes to withdraw the onboarding access.
As an admin, you can also create and download the Employee Onboarding report on the Query Builder page.
Frequently Asked Questions
What is employee onboarding in greytHR?
Employee onboarding in greytHR is a feature that helps HR admins smoothly integrate new hires by providing required resources and information. It allows admins to configure onboarding forms, review/approve employee details, define document types, and ensure policy acknowledgments.
What are the key steps involved in the greytHR employee onboarding process?
The process includes configuration of the onboarding form, starting onboarding for a new employee, reminding employees to submit details, and reviewing the employee onboarding submissions.
How do HR admins use the greytHR onboarding feature?
HR admins use the greytHR onboarding feature to configure onboarding forms, review and approve/reject employee details, define required document types, and ensure employees acknowledge policies and forms.
Where do I configure the employee onboarding form in greytHR?
From the greytHR Admin portal, go to the Settings icon > System Settings > Employee > Employee onboarding.
Go to the Employee Information Settings tab. Configure the employee onboarding form by specifying sections such as Personal Information, Previous Employment, Accounts & Statutory, Family Details, and Nomination Details. Click Save to apply your settings.
What kind of information can I configure in the Employee Onboarding form settings?
In the Employee Information Settings tab, you can configure sections like Personal Information, Previous Employment, Accounts & Statutory, Family Details, and Nomination Details.
Can I make certain fields mandatory in the onboarding form?
Yes, you can set fields as Mandatory, requiring employees to provide the required details. You can also set them as Display for viewing only.
How do I customize the list of required documents for onboarding?
From the greytHR Admin portal, go to the Settings icon > System Settings > Employee > Employee onboarding and click the Employee Document Settings tab.
You can either customize the list of available documents or create a new document as per the requirements.
How do I create a new document type for employee onboarding?
In the Employee Document Settings tab, click Create Document Type, enter the Document Title, select a Category, add Instructions, and select Mandatory if required. Then click Create.
Can I mark specific documents as mandatory for onboarding?
Yes, after creating the document type, you can mark the Mandatory column to designate required document types and save it.
How do I initiate the onboarding process for a new employee while adding them to the system?
From your greytHR Admin portal, select Add Employee from the NAVOS search box.
Note: Alternatively, you can add a new employee from the Analytics Hub page by clicking the Add Employee option.
In the add employee wizard, start updating the employee details.
Basic Information
Employee Position
Statutory Info
Payment Mode
Note: If you’ve enabled the greytHR Rehire Check feature from System Settings, greytHR lets you check if you are hiring a former employee using the employee’s Aadhar and PAN number. Make sure to remove the separation details before proceeding.
Once done, click Finish to complete adding a new employee.
Note: You can revisit the previous steps before you finish. If you click Cancel, then you will lose unsaved changes.
Click Close in the summary message to confirm adding an employee, or click Add Another Employee to add another new employee.
How will the employee get the onboarding notification?
While adding the employee details, from the Basic Information section, select the Allow the employee to fill in their information option to initiate the onboarding process for the employee.
An email invitation will be sent to the employee, guiding them to complete their profile once you complete the add employee wizard.
How does the employee complete the onboarding process?
After an employee is added to the system, they will receive an onboarding email. They must submit their requested information for all specified categories to complete their onboarding process.
Click here to watch our video or read more about the employee onboarding submission.
What does rehiring mean in greytHR?
Rehiring refers to the process where a former employee who previously resigned wishes to rejoin your organization. greytHR provides a streamlined feature to manage this process.
What is greytHR's Rehire Check feature?
The Rehire Check feature in greytHR helps to simplify the re-hiring process by verifying the former employee's previous records, ensuring data consistency, and preventing the creation of duplicate employee profiles.
What are the main steps involved in rehiring a former employee in greytHR?
The main steps involved in rehiring a former employee in greytHR are:
Configure employee RehireCheck settings.
Remove an employee’s separation details.
Rehire a former employee.
What actions can I perform on the Employee Options page for RehireCheck?
On the Employee Options page, you can:
Enable/Disable the RehireCheck feature.
Customize mandatory fields for the RehireCheck feature (e.g., Aadhaar number).
Select the mandatory fields to copy to the employee information after a successful Rehire Check.
What happens if I disable the RehireCheck feature?
If you disable the RehireCheck feature, you will not be able to view the Rehire Check step on the Add Employee page when adding a new employee to the database.
How do I enable or disable the RehireCheck feature?
From the greytHR Admin portal, navigate to Settings icon > System settings > Employee > Employee Options.
On the Employee Options page, select/deselect the Enable Rehire Check in Add Employee checkbox.
Click Save to update the changes.
Are there any default mandatory fields for the RehireCheck feature?
By default, the Aadhaar number field is selected as mandatory. However, you can add additional mandatory fields.
How do I customize the mandatory fields for the RehireCheck feature?
From the greytHR Admin portal, navigate to Settings icon > System settings > Employee > Employee Options.
On the Employee Options page, from the Select criteria for Rehire Check field, select the required mandatory fields that you want to validate.
Click Save to update the changes.
Why would I want to select mandatory fields to copy to employee information?
After the Rehire Check step, if matching resigned employee details are found, you can choose to copy these details to the new employee's profile. This configuration allows you to pre-define which specific fields (e.g., name, date of birth) will be copied, saving time and ensuring consistency.
Why do I need to remove an employee's separation details before rehiring them?
When an employee leaves, their separation details (like separation date, reason, etc.) are recorded. To reactivate a former employee's profile for rehiring, these separation details need to be removed from the system.
How do I remove an employee's separation details in greytHR?
From the greytHR Admin portal, hover over the 9 dots and select Employee > Information > Separation.
On the Separation page, from the Employee Type dropdown list, select Resigned Employees.
In the Search Employee text box, search for the employee.
Under the Resignation Status section, from the Separation Mode dropdown list, select Resigned.
Clear all the details from the Resignation Details, Exit Interview, and Exit Details sections. The employee profile will be reactivated once these details are removed.
How do I rehire a former employee once the settings are configured?
After configuring the Rehire Check feature and removing separation details, you can rehire a former employee by following the same steps as adding a new employee.
What happens during the Rehire Check step when rehiring?
During Step 1: Rehire Check, you will enter details like Name, Date of Birth, Aadhaar Number, and PAN Number (if configured). The system will then check for any duplicate entries, including both exited and active employees.
How do I proceed after identifying the former employee during Rehire Check?
After verifying the information, select the radio button on the exited employee card. This selection allows you to continue adding the remaining details for the re-hired employee.
What details will be visible during the Rehire Check?
A list of employee records matching the entered details will appear. You can click the ">" arrow on a relevant employee card to view their joining/exit details.
For exited employees, you can click View Details to see complete off-boarding information.
For active employees, View Details will take you to their profile.
Can I initiate onboarding for existing employees?
Yes, you can initiate or re-initiate onboarding for existing employees from the Employee Onboarding page.
How do I initiate onboarding for existing employees?
To initiate onboarding for existing employees manually, select Employee Onboarding from the NAVOS search box.
From the Status dropdown list, select Not Initiated. Select the employees using the checkboxes.
Click Employee Onboarding Policy to check the configurations before initiating the onboarding process. This is a recommended step.
Click Initiate Onboarding and confirm to initiate onboarding.
How do I re-initiate onboarding for existing employees?
To re-initiate onboarding for existing employees, select Employee Onboarding from the NAVOS search box.
Select the status as Closed and choose the employee(s) with the verification status as Verified.
Customize the Employee Onboarding form as per the information required. For example, if you need to collect previous employment information from the existing employees, then you can customize the form accordingly.
Finally, click Initiate Onboarding. The employees will receive an email to complete the process, and you can review the details once the employees submit them.
What are the different statuses for employee onboarding requests?
The different statuses are Not Initiated, Active, and Closed.
What does the Active status mean on the Employee Onboarding page?
On the Employee Onboarding page, the Active status displays a list of employees for whom onboarding is initiated but not yet submitted by the employee, or initiated and submitted but not yet verified by the admin.
What does the Closed status mean on the Employee Onboarding page?
On the Employee Onboarding page, the Closed status displays a list of employees for whom the onboarding submission is verified or withdrawn by the admin.
What does a red employee row indicate on the Employee Onboarding page?
A red row means that the email ID for that employee is missing.
How do I release onboarding access for an employee with a missing email ID?
Update the employee's email ID by hovering over the 9 dots. Select Employee > Information > Employee Profile. After updating, you can release onboarding access.
How do I review an individual employee's onboarding submission?
To review the onboarding details, hover over the 9 dots icon and select Workflow > Modules > Employee Onboarding.
Under the Active tab, search for the employee and click Verify. Review each category and select Accept or Reject as needed. Once done, click Submit to complete the review or Resend if you need the employee to resubmit their onboarding details.
What information is displayed on the Employee Onboarding page?
The Employee Onboarding page displays a list of submitted onboarding forms with their status and submission date, categorized under 'Active' and 'Closed' tabs.
Can I accept or reject individual pieces of information within a submission?
Yes, you must ensure to either Accept or Reject the information submitted by the employee under each section.
Where can I see the company policies acknowledged by the employee during onboarding?
You can view acknowledged company policies/forms under the Company Policies and Forms tab on the Verify Employee Onboarding page.
What actions can I take after verifying an employee's onboarding details?
After verifying an employee’s onboarding details, you can either Resend/Submit.
What does the 'Resend' option do during the review process?
The Resend option allows you to resend only the sections requiring re-verification to the employee.
Where can I see the employees’ onboarding submissions after approval?
The approved information is updated in the application under Employee > Information > Employee Documents.
How can employees view the documents verified by the admin?
Employees can view and download the documents verified by you under Documents in their ESS portal.
How can I remind an employee to complete their onboarding?
To remind an employee to complete their onboarding, hover over the 9 dots and select Workflow > Modules > Employee Onboarding page.
On the Employee Onboarding page, under the Active tab, click the employee card, and click Remind. Confirm by clicking Yes.
How do I withdraw an onboarding request that has been initiated?
On the Employee Onboarding page, under the Active tab, click the employee card, and click Withdraw. Confirm by clicking Yes.
Will the employee be notified if I withdraw their onboarding access?
Yes, if the Notify employee option is selected, an email is sent to the employee.
Where can I get a report on employee onboarding?
As an admin, you can create and download the Employee Onboarding report on the Query Builder page under the Reports section.
How to update employee information without using greytHR's onboarding feature?
If you are not using the greytHR’s onboarding feature, you will need to manually collect employee information and update it in greytHR.
Related Articles:
Was this article helpful?
More resources:
▶ Video - Watch our how-to videos to learn more about greytHR.
📢 Product Update - Read about the product updates.